GitLab CI/CD
官方文档:https://docs.gitlab.com/ee/ci/index.html
GitLab CI/CD是GitLab提供的持续集成/部署工具,持续集成(CI)在每次向仓库push代码、合并到主分支前时执行构建和测试脚本,持续部署(CD)在每次向主分支push代码时将应用部署到服务器
GitLab CI/CD通过仓库根目录下一个名为.gitlab-ci.yml的文件进行配置,该文件创建了一个pipeline,一个pipeline由一个或多个顺序执行的stage组成,每个stage包含一个或多个并行执行的job,这些job(或脚本)由GitLab Runner执行
要使用GitLab CI/CD需要两步:注册runner;创建YAML文件
GitLab Runner
官方文档:https://docs.gitlab.com/runner/
runner是执行CI/CD job的机器(本地主机或docker容器),在项目 -> Settings -> CI/CD -> Runners可查看项目可用的runner
GitLab提供了一些所有项目都可使用的shared runner,也可以安装和注册自己的runner
安装runner的主机不一定要有公有IP,因为是runner定期向GitLab查询是否有需要执行的job,而不是每次提交代码触发pipeline后GitLab主动向选择的runner发送消息,因此每次提交代码后虽然GitLab会立即创建一个pipeline,但其中的job会等待一段时间(pending状态)才会开始执行,此时页面显示”This job is in pending state and is waiting to be picked by a runner”
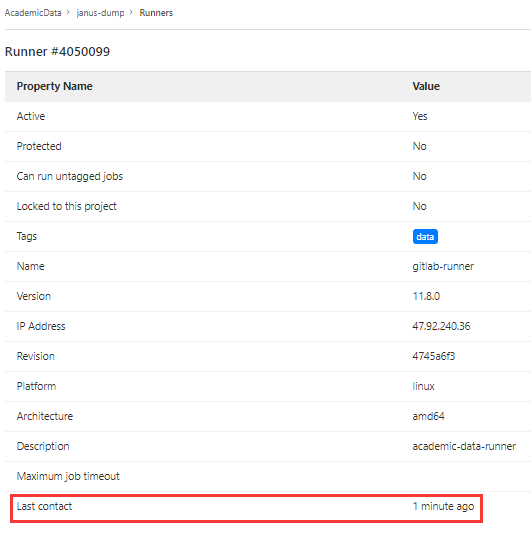
在GitLab上编辑runner的界面可以看到”Last contact”,可也以证明GitLab与runner是定期通信的
runner分为三种:
- shared runner:所有项目均可使用,由gitlab.com提供
- group runner:一个组下的所有项目均可使用,在组 -> Settings -> CI/CD -> Runners可以看到可用的runner以及注册runner所需的URL和token
- specific runner:只有特定项目使用,需要为每个项目分别启用,在项目 -> Settings -> CI/CD -> Runners可以看到可用的runner以及注册runner所需的URL和token
注册runner
官方文档:https://docs.gitlab.com/runner/register/
以Linux为例
- 执行命令
sudo gitlab-runner register - 输入上面看到的GitLab URL
- 输入上面看到的token
- 输入描述(之后可在GitLab上修改)
- 输入tag,逗号分隔(之后可在GitLab上修改)
- 输入executor(如ssh, shell或docker等)
注册完成后即可在项目或组的设置中看到添加的runner:
在项目的CI/CD设置中也可以看到可用的runner:
Runner tag
官方文档:https://docs.gitlab.com/ee/ci/runners/#use-tags-to-limit-the-number-of-jobs-using-the-runner
与git tag不同,GitLab CI tag是runner的标签,使得shared runner只运行具有该标签的job,可在GitLab上修改runner配置使其运行无标签的job
Executor
官方文档:https://docs.gitlab.com/runner/executors/README.html
指定runner执行命令的具体环境
(1)ssh:通过ssh在远程机器上执行命令,在注册runner时会提示输入host, port, user, password等连接参数,也可以在config.toml(位于/etc/gitlab-runner/config.toml,需要root权限)中指定连接配置:
1
2
3
4
5
6
7
8
9
10
11
[[runners]]
  name = "my-runner"
  url = "https://gitlab.com/"
  token = "xxx"
  executor = "ssh"
  [runners.ssh]
    host = "192.168.0.90"
    port = "22"
    user = "yourname"
    password = "xxx"
    identity_file = "/home/gitlab-runner/.ssh/id_rsa"
其中password和identity_file可以只使用一个,或二者都使用
通过在安装GitLab Runner的机器上的gitlab-runner用户生成ssh-key,并将公钥添加到远程主机的/home/<yourname>/.ssh/authorized_keys文件中实现免密登录
项目代码将被pull到~/builds/<runner-id>/0/<group-name>/<project-name>/目录下(用户是ssh连接的用户),要覆盖~/builds/,在配置文件的[[runner]]中指定builds_dir选项
(2)shell:在安装GitLab Runner的机器(可能是docker容器)上执行命令
项目代码将被pull到/home/gitlab-runner/builds/<runner-id>/0/<group-name>/<project-name>/目录下,要自定义该目录,在配置文件的[[runner]]中指定builds_dir选项
(3)docker:使用.gitlab-ci.yml指定的image创建一个docker容器,并在其中执行命令
创建YAML文件
官方文档:https://docs.gitlab.com/ee/ci/yaml/gitlab_ci_yaml.html
在项目根目录下创建一个名为.gitlab-ci.yml的文件,内容如下:
1
2
3
4
5
6
7
8
9
10
11
12
13
14
15
16
17
18
19
20
21
22
23
24
25
26
27
stages:
  - build
  - test
  - deploy

build-job:
  stage: build
  script:
    - echo "Hello, $GITLAB_USER_LOGIN!"

test-job1:
  stage: test
  script:
    - echo "This job tests something"

test-job2:
  stage: test
  script:
    - echo "This job tests something, but takes more time than test-job1."
    - echo "After the echo commands complete, it runs the sleep command for 20 seconds"
    - echo "which simulates a test that runs 20 seconds longer than test-job1"
    - sleep 20

deploy-prod:
  stage: deploy
  script:
    - echo "This job deploys something from the $CI_COMMIT_BRANCH branch."
其中stages指定pipeline包含的stage(顺序执行),默认为build, test和deploy
查看job状态
在项目的CI/CD - Pipelines可查看pipeline和job的执行状态
执行pipeline
定义好pipeline之后,每次向默认分支提交代码时都将触发该pipeline,自动在安装GitLab Runner的机器上(可能是docker容器)执行gitlab-runner run命令启动指定的runner
首先runner会自动拉取代码到~/builds/<runner-id>/0/<group-name>/<project-name>/目录下,执行job时的工作目录即为该目录(如果选择ssh executor,则 ~ 为ssh登录用户的主目录;如果选择shell executor,则 ~ 为安装GitLab Runner的机器上gitlab-runner用户的主目录)
如果需要gradle, MySQL等依赖则需要提前手动安装;如果使用docker executor则可以在YAML文件中通过image和services关键字指定所需依赖,runner执行时会自动安装
构建和测试完成后,要将应用部署到目标服务器上,有两种方案:
- 在目标服务器上编写一个部署脚本,内容是pull代码、kill掉现有应用进程、重新启动应用等,在pipeline的deploy阶段通过ssh执行该脚本(例如ssh yourname@192.168.xxx.xxx ‘./deploy.sh’),runner的执行环境(ssh executor - 远程主机;shell executor - 安装GitLab Runner的机器;docker executor - docker容器)应当能够访问目标服务器的IP,通过ssh密钥对实现免密登录
- 遇到的问题:Host key verification failed,解决方法:(1)确保生成密钥对的用户是runner在执行环境中的用户(ssh executor - ssh登录用户;shell executor - gitlab-runner);(2)添加公钥后在执行环境中使用ssh连接一次目标服务器,从而将目标服务器的IP添加到容器的known_hosts中
- 如果将应用打包为单个文件(例如jar),则可以通过scp或docker cp命令将打包好的文件直接复制到目标服务器上
- 注意:runner在执行每个job前会先拉取代码,并删除构建生成的二进制文件(如Gradle的.gradle和build目录、Python的__pycache__目录),因此最后还需要重新打包


