Go语言入门教程
1.简介
Go语言是由Google开发的开源编程语言,以其简洁高效的语法著称。Go内置并发支持(goroutine和channel),编译速度快,特别适合构建高并发网络服务和云原生应用。
- 网站:https://go.dev/(或 https://golang.google.cn/ )
- 官方文档:https://go.dev/doc/
- 官方教程:https://go.dev/doc/tutorial/
- Go Playground: https://go.dev/play/
2.安装
下载地址:https://go.dev/dl/
安装指引:https://go.dev/doc/install
对于Windows系统,下载MSI安装包(例如go1.25.6.windows-amd64.msi)。安装程序会自动将安装目录中的bin目录添加到Path环境变量。
对于Linux系统,下载.tar.gz压缩包(例如go1.25.6.linux-amd64.tar.gz)。将其解压到/usr/local目录,之后将/usr/local/go/bin添加PATH环境变量。
1
2
tar -C /usr/local -xzf go1.25.6.linux-amd64.tar.gz
export PATH=$PATH:/usr/local/go/bin
验证安装成功:
1
2
$ go version
go version go1.25.6 windows/amd64
Go语言源文件的扩展是.go。在任意目录下创建一个文件hello.go,内容如下:
1
2
3
4
5
6
7
package main

import "fmt"

func main() {
	fmt.Println("Hello, World!")
}
使用go命令执行上面的代码,输出结果如下:
1
2
$ go run hello.go
Hello, World!
3.入门
本教程将简要介绍Go语言,包括:
- 编写简单的 “Hello, world” 程序
- 使用
go命令运行代码 - 调用外部模块的函数
3.1 Hello world
1.打开一个命令行窗口并切换到主目录。
2.创建一个helloworld目录。
1
2
mkdir helloworld
cd helloworld
3.开启依赖管理。
代码中依赖的其他模块由项目根目录中名为go.mod的文件定义(类似于Python的requirements.txt)。
运行go mod init命令将创建go.mod文件并开启依赖管理,需要指定模块名称。名称是模块路径(通常是仓库位置,例如github.com/myname/mymodule),详见Managing dependencies。
在本教程中,使用example/hello作为模块名称:
1
2
$ go mod init example/hello
go: creating new go.mod: module example/hello
4.使用文本编辑器创建一个文件hello.go。
5.将以下代码粘贴到hello.go并保存(注意缩进使用Tab而不是空格):
1
2
3
4
5
6
7
package main

import "fmt"

func main() {
	fmt.Println("Hello, World!")
}
这段Go代码
- 声明了一个
main包(包由同一个目录下的所有文件组成)。 - 导入了fmt包,包含格式化文本和控制台打印函数。这个包是标准库的一部分。
- 实现了一个
main()函数用于向控制台打印消息。当运行main包时将默认执行main()函数。
6.运行代码。
1
2
$ go run .
Hello, World!
go run命令用于编译并运行Go程序。可以使用go help命令查看所有命令的列表。
3.2 调用外部包
你的代码可以调用由其他人编写的包中的函数。
1.查找外部包
- 访问 https://pkg.go.dev/ ,搜索 “quote” 。
- 在搜索结果中找到
rsc.io/quote包,并点击 “Other major versions” 中的v1。 - Documentation - Index一节列出了可以调用的函数。这里使用
Go()函数。 - 在页面顶端可以看到
quote包包含在rsc.io/quote模块中。
注:
- pkg.go.dev是一个可以搜索Go包的网站,类似于Python的pypi.org。
- Go的“包”和“模块”的含义与Python不同。在Python中,模块=文件,包=目录;在Go中,模块=项目,包=同一个目录下的所有文件。
2.在代码中导入rsc.io/quote包并调用其中的Go()函数。
1
2
3
4
5
6
7
8
9
package main

import "fmt"

import "rsc.io/quote"

func main() {
	fmt.Println(quote.Go())
}
3.添加模块依赖。
1
$ go mod tidy
go mod tidy命令会自动更新go.mod和go.sum文件(用于认证模块,详见Authenticating modules),添加缺失的依赖,删除无用的依赖,并自动下载依赖的模块。
注:
- 模块会被下载到$GOPATH/pkg/mod目录。环境变量GOPATH默认为$HOME/go,可通过
go env命令查看。 go mod tidy命令可能会报错:
1
2
go: example/hello imports
        rsc.io/quote: module rsc.io/quote: Get "https://proxy.golang.org/rsc.io/quote/@v/list": dial tcp 142.251.45.145:443: connectex: A connection attempt failed because the connected party did not properly respond after a period of time, or established connection failed because connected host has failed to respond.
这是因为默认的代理proxy.golang.org无法访问(由环境变量GOPROXY指定)。解决方法:使用代理服务goproxy.io,只需设置环境变量GOPROXY即可:
1
$ go env -w GOPROXY=https://goproxy.io,direct
再次尝试即可下载成功:
1
2
3
4
5
6
$ go mod tidy
go: finding module for package rsc.io/quote
go: downloading rsc.io/quote v1.5.2
go: found rsc.io/quote in rsc.io/quote v1.5.2
go: downloading rsc.io/sampler v1.3.0
go: downloading golang.org/x/text v0.0.0-20170915032832-14c0d48ead0c
- 如果使用GoLand,需要开启Go模块集成:打开设置 - Go - Go Modules,勾选Enable Go modules integration。
4.运行代码
1
2
$ go run .
Don't communicate by sharing memory, share memory by communicating.
完整代码:helloworld/hello.go
4.模块
在本教程中,将创建两个模块。第一个是库,可以被其他库或应用程序导入。第二个是应用程序,将使用第一个模块。
4.1 创建模块
Go的代码组织成包,包组织成模块。模块定义了运行代码所需的依赖,包括Go版本以及依赖的其他模块。
1.在主目录(或其他任意目录)中创建一个greetings模块。
1
2
3
mkdir greetings
cd greetings
go mod init example.com/greetings
2.创建一个文件greetings.go,内容如下:
1
2
3
4
5
6
7
8
9
10
package greetings
import "fmt"
// Hello returns a greeting for the named person.
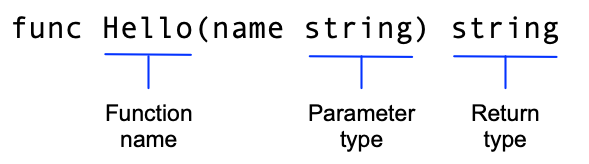
func Hello(name string) string {
// Return a greeting that embeds the name in a message.
message := fmt.Sprintf("Hi, %v. Welcome!", name)
return message
}
在这段代码中
- 声明了一个
greetings包。 - 定义了一个
Hello()函数,用于返回问候语。这个函数接受一个string类型的参数name,返回一个string。在Go中,名字以大写字母开头的函数可以被其他包中的函数调用,这叫做导出名字(exported name)。
- 在函数
Hello()中声明了一个变量message来存放问候语。运算符:=是在一行内声明和初始化变量的快捷方式,等价于:
1
2
var message string
message = fmt.Sprintf("Hi, %v. Welcome!", name)
- 使用标准库
fmt包的Sprintf()创建问候语消息(类似于C语言的sprintf()函数)。第一个参数是格式字符串,使用name的值替换%v(格式字符串语法参见Printing)。 - 返回格式化后的问候语。
下一步将从另一个模块调用这个函数。
4.2 调用模块
Call your code from another module
在本节中,将编写一个可执行程序,并调用greetings模块中的函数。
1.在greetings所在目录中创建另一个模块hello。
1
2
3
4
cd ..
mkdir hello
cd hello
go mod init example.com/hello
目录结构如下:
1
2
3
4
5
6
home/
    greetings/
        go.mod
        greetings.go
    hello/
        go.mod
2.在hello目录中创建一个文件hello.go,内容如下:
1
2
3
4
5
6
7
8
9
10
11
12
13
package main

import (
	"fmt"

	"example.com/greetings"
)

func main() {
	// Get a greeting message and print it.
	message := greetings.Hello("Gladys")
	fmt.Println(message)
}
在这段代码中
- 声明了一个
main包。在Go中,可执行程序的代码必须在main包中。 - 导入了两个包:
fmt和example.com/greetings,从而代码可以调用这些包中的函数。 - 调用
greetings包的Hello()函数获取问候语,然后调用fmt包的Println()函数将其打印到控制台。
3.在本地找到greetings模块。
上面的代码导入了example.com/greetings模块。默认情况下,Go会从这个URL查找并下载该模块。但目前该模块还未发布,因此需要让hello模块在本地文件系统找到greetings模块。
为此,使用go mod edit命令编辑hello模块:
1
go mod edit -replace example.com/greetings=../greetings
该命令将模块路径example.com/greetings重定向到本地目录../greetings。执行该命令后,hello目录中的go.mod文件将增加一个replace指令:
1
replace example.com/greetings => ../greetings
接着,执行go mod tidy命令,同步hello模块的依赖:
1
2
$ go mod tidy
go: found example.com/greetings in example.com/greetings v0.0.0-00010101000000-000000000000
执行该命令后,hello模块的go.mod文件将再增加一个require指令:
1
require example.com/greetings v0.0.0-00010101000000-000000000000
模块路径后面的数字是伪版本号。为了引用已发布的模块,go.mod文件应该省略replace指令并使用带有真实版本号的require指令,例如
1
require example.com/greetings v1.1.0
关于版本号详见Module version numbering。
4.运行代码,在hello目录中执行
1
2
$ go run .
Hi, Gladys. Welcome!
完整代码:
4.3 错误处理
处理错误是可靠代码的一个基本特征。在本节中,将在greetings模块中添加返回错误的代码,并在调用代码中处理错误。
1.修改greetings/greetings.go,如果name为空则返回错误:
1
2
3
4
5
6
7
8
9
10
11
12
13
14
15
16
17
18
package greetings

import (
	"errors"
	"fmt"
)

// Hello returns a greeting for the named person.
func Hello(name string) (string, error) {
	// If no name was given, return an error with a message.
	if name == "" {
		return "", errors.New("empty name")
	}

	// If a name was received, return a value that embeds the name in a greeting message.
	message := fmt.Sprintf("Hi, %v. Welcome!", name)
	return message, nil
}
在这段代码中
- 修改了函数使其返回两个值:一个
string和一个error。调用者会检查第二个值以查看是否发生了错误。 - 导入了标准库
errors包,以便使用errors.New()函数。 - 添加了一个
if语句以检查参数,如果参数无效(name为空字符串)则返回一个错误。errors.New()函数返回一个具有给定错误消息的error。 - 成功返回时第二个值为
nil(表示没有错误),这样调用者就能知道函数成功了。
2.修改hello/hello.go,处理Hello()函数返回的错误:
1
2
3
4
5
6
7
8
9
10
11
12
13
14
15
16
17
18
19
20
21
22
23
24
25
26
package main

import (
	"fmt"
	"log"

	"example.com/greetings"
)

func main() {
	// Set properties of the predefined Logger, including
	// the log entry prefix and a flag to disable printing
	// the time, source file, and line number.
	log.SetPrefix("greetings: ")
	log.SetFlags(0)

	// Request a greeting message.
	message, err := greetings.Hello("")
	// If an error was returned, print it to the console and exit the program.
	if err != nil {
		log.Fatal(err)
	}

	// If no error was returned, print the returned message to the console.
	fmt.Println(message)
}
在这段代码中
- 配置了
log模块打印日志消息的前缀("greetings: ")。 - 将
Hello()的两个返回值分别赋给变量。 - 将调用
Hello()的参数改为空字符串,以便测试错误处理代码。 - 如果错误不是
nil,使用标准库log包的Fatal()函数打印错误信息并终止程序。
3.在hello目录中运行代码:
1
2
3
$ go run .
greetings: empty name
exit status 1
这就是Go中常见的错误处理方式:将错误作为返回值,由调用者检查(Go没有异常和try语句)。
完整代码:
4.4 返回随机问候语——使用切片
在本节中将修改代码,返回几个预定义问候语中的随机一个,而不是每次返回固定的问候语。为此,要使用Go的切片(slice)。
切片类似于数组,但大小会随着添加和删除元素动态变化。关于切片详见Go slices。(注:Go的切片相当于Python的list,与Python的切片不是一回事)
1.修改greetings/greetings.go,添加一个包含三条问候语消息的切片,然后随机返回其中一条。
1
2
3
4
5
6
7
8
9
10
11
12
13
14
15
16
17
18
19
20
21
22
23
24
25
26
27
28
29
30
31
32
33
34
package greetings

import (
	"errors"
	"fmt"
	"math/rand"
)

// Hello returns a greeting for the named person.
func Hello(name string) (string, error) {
	// If no name was given, return an error with a message.
	if name == "" {
		return "", errors.New("empty name")
	}

	// Create a message using a random format.
	message := fmt.Sprintf(randomFormat(), name)
	return message, nil
}

// randomFormat returns one of a set of greeting messages. The returned
// message is selected at random.
func randomFormat() string {
	// A slice of message formats.
	formats := []string{
		"Hi, %v. Welcome!",
		"Great to see you, %v!",
		"Hail, %v! Well met!",
	}

	// Return a randomly selected message format by specifying
	// a random index for the slice of formats.
	return formats[rand.Intn(len(formats))]
}
在这段代码中
- 添加了一个
randomFormat()函数,返回随机选择的问候语格式字符串。注意,以小写字母开头的函数只能在同一个包中访问(即非导出的)。 - 在
randomFormat()中,声明了一个切片formats,包含三个格式字符串。在声明切片时,省略方括号中的大小,例如[]string。这意味着底层数组的大小可以动态改变。 - 使用math/rand包中的
Intn()函数生成一个[0, 3)之间的随机数,用于从切片中选择一项。 - 在
Hello()中,将固定问候语改为调用randomFormat()。
2.将hello/hello.go中调用Hello()函数的参数恢复为非空值。
1
message, err := greetings.Hello("Gladys")
3.在hello目录中运行代码。多次运行,注意到问候语会变化。
1
2
3
4
5
6
7
8
$ go run .
Great to see you, Gladys!

$ go run .
Hi, Gladys. Welcome!

$ go run .
Hail, Gladys! Well met!
完整代码:
4.5 为多个人返回问候语——使用映射
Return greetings for multiple people
在本节中,将支持为多个人分别返回问候语。换句话说,向函数传递一组名字(使用切片),返回每个人对应的问候语。为此,需要使用映射(map)。
但是,直接修改函数Hello()的参数类型会改变函数的签名。如果你已经发布了example.com/greetings模块并且其他人已经编写了调用Hello()的代码,这种改变将破坏他们的程序。在这种情况下,更好的选择是编写一个具有不同名称的新函数,以保持旧函数向后兼容。
1.修改greetings/greetings.go,添加一个函数Hellos()。
1
2
3
4
5
6
7
8
9
10
11
12
13
14
15
16
// Hellos returns a map that associates each of the named people with a greeting message.
func Hellos(names []string) (map[string]string, error) {
	// A map to associate names with messages.
	messages := make(map[string]string)
	// Loop through the received slice of names, calling
	// the Hello function to get a message for each name.
	for _, name := range names {
		message, err := Hello(name)
		if err != nil {
			return nil, err
		}
		// In the map, associate the retrieved message with the name.
		messages[name] = message
	}
	return messages, nil
}
在这段代码中
- 添加了一个
Hellos()函数,其参数是一个切片而不是单个string,返回类型从string改为map[string]string,从而可以返回名字到问候语的映射。 - 让新的
Hellos()函数调用已有的Hello()函数,这有助于减少重复。 - 创建了一个映射
messages,将每个名字(作为键)关联到生成的问候语(作为值)。在Go中,使用语法make(map[KeyType]ValueType)初始化一个映射。关于映射详见Go maps in action。 - 遍历函数接收的
names切片,检查每一个都非空,然后将每个名字关联一条消息。在这个for循环中,range返回两个值:当前项的索引和值的拷贝。这里不需要索引,因此使用空白标识符(_)忽略它。(注:Go的关键字range类似于Python的enumerate()函数)
2.在hello/hello.go中调用Hellos()函数,传递一个名字的切片,然后打印返回的映射。
1
2
3
4
5
6
7
8
9
10
11
12
// A slice of names.
names := []string{"Gladys", "Samantha", "Darrin"}

// Request greeting messages for the names.
messages, err := greetings.Hellos(names)
// If an error was returned, print it to the console and exit the program.
if err != nil {
	log.Fatal(err)
}

// If no error was returned, print the returned map of messages to the console.
fmt.Println(messages)
3.运行代码,将输出名字/消息映射的字符串表示。
1
2
$ go run .
map[Darrin:Hail, Darrin! Well met! Gladys:Hi, Gladys. Welcome! Samantha:Hail, Samantha! Well met!]
完整代码:
4.6 单元测试
本节将为Hello()函数添加测试。Go提供了对单元测试的内置支持:使用命名约定、testing包和go test命令可以快速编写和执行测试。
1.在greetings目录中,创建一个名为greetings_test.go的文件。以 _test.go 结尾的文件名告诉go test命令这个文件包含测试函数。
2.文件greetings_test.go的内容如下:
1
2
3
4
5
6
7
8
9
10
11
12
13
14
15
16
17
18
19
20
21
22
23
24
package greetings

import (
	"regexp"
	"testing"
)

// TestHelloName calls greetings.Hello with a name, checking for a valid return value.
func TestHelloName(t *testing.T) {
	name := "Gladys"
	want := regexp.MustCompile(`\b` + name + `\b`)
	msg, err := Hello(name)
	if !want.MatchString(msg) || err != nil {
		t.Errorf(`Hello("Gladys") = %q, %v, want match for %#q, nil`, msg, err, want)
	}
}

// TestHelloEmpty calls greetings.Hello with an empty string, checking for an error.
func TestHelloEmpty(t *testing.T) {
	msg, err := Hello("")
	if msg != "" || err == nil {
		t.Errorf(`Hello("") = %q, %v, want "", error`, msg, err)
	}
}
在这段代码中
- 创建了两个测试函数来测试
greetings.Hello(),与被测函数在同一个包中。TestHelloName()使用一个名字调用Hello(),应该返回合法的消息。如果函数返回了一个错误或者不符合预期的消息(不包含传入的名字),则测试失败。TestHelloEmpty()用一个空字符串调用Hello(),应该返回错误。如果函数返回了非空字符串或者未返回错误,则测试失败。
- 测试函数名的形式为
TestName,其中Name表示特定测试的信息(如被测函数、测试点)。测试函数接受一个指向testing.T类型的指针参数,可以使用这个参数的方法报告错误和输出日志。
3.在greetings目录中,使用go test命令执行测试。可以添加-v标志获得详细输出,这将列出所有测试及其结果。
1
2
3
4
5
6
7
8
9
10
11
$ go test
PASS
ok      example.com/greetings   0.038s

$ go test -v
=== RUN   TestHelloName
--- PASS: TestHelloName (0.00s)
=== RUN   TestHelloEmpty
--- PASS: TestHelloEmpty (0.00s)
PASS
ok      example.com/greetings   0.036s
4.使测试失败。
测试函数TestHelloName()检查Hello()的返回值包含参数指定的名字。为了查看失败的测试结果,修改Hello()函数(假设出现了错误):
1
2
// message := fmt.Sprintf(randomFormat(), name)
message := fmt.Sprint(randomFormat())
5.再次运行测试,TestHelloName()应该会失败。
1
2
3
4
5
6
$ go test
--- FAIL: TestHelloName (0.00s)
    greetings_test.go:14: Hello("Gladys") = "Hail, %v! Well met!", <nil>, want match for `\bGladys\b`, nil
FAIL
exit status 1
FAIL    example.com/greetings   0.035s
完整代码:greetings/greetings_test.go
4.7 编译和安装应用
Compile and install the application
go run命令是编译和运行程序的快捷方式,但它不会保留可执行文件(生成在临时目录中,运行后自动删除)。本节将介绍另外两个命令:
- go build命令编译包及其依赖。
- go install命令编译包及其依赖并安装。
1.打开命令行,在hello目录中执行go build命令,将代码编译成可执行文件。
2.运行生成的可执行文件hello(或hello.exe)。
在Linux或Mac上:
1
2
$ ./hello
map[Darrin:Great to see you, Darrin! Gladys:Hail, Gladys! Well met! Samantha:Hail, Samantha! Well met!]
在Windows上:
1
2
$ hello.exe
map[Darrin:Great to see you, Darrin! Gladys:Hail, Gladys! Well met! Samantha:Hail, Samantha! Well met!]
现在已经把应用程序编译为可执行文件,但是命令行需要位于可执行文件所在目录,或者指定完整路径才能运行它。接下来将安装可执行文件,以便不指定路径(即在任意目录中直接输入hello)即可运行。
3.使用go list命令查看安装路径。
1
go list -f '{{.Target}}'
例如,该命令可能输出 /home/gopher/go/bin/hello ,表示安装路径为 /home/gopher/go/bin 。
注:安装路径由环境变量GOBIN指定,默认为$GOPATH/bin。
4.将安装路径添加到PATH环境变量,这样无需指定文件位置即可运行程序。
在Linux或Mac上:
1
export PATH=$PATH:/home/gopher/go/bin
在Windows上:
1
set PATH=%PATH%;C:\Users\gopher\go\bin
5.运行go install命令编译并安装hello包。
1
go install
6.打开一个新的命令行窗口,在其他目录中直接输入hello即可运行程序。
1
2
$ hello
map[Darrin:Hail, Darrin! Well met! Gladys:Great to see you, Gladys! Samantha:Hail, Samantha! Well met!]
5.泛型
Tutorial: Getting started with generics
本教程将介绍Go中泛型(generics)的基础知识。使用泛型可以编写能够用于多种类型的函数或类型。
注:泛型是Go 1.18中引入的。
5.1 创建目录
创建一个generics模块。
1
2
3
mkdir generics
cd generics
go mod init example/generics
5.2 添加非泛型函数
1.创建一个文件main.go,内容如下:
1
2
3
4
5
6
7
8
9
10
11
12
13
14
15
16
17
18
19
20
21
22
23
24
25
26
27
28
29
30
31
32
33
34
35
36
37
package main

import "fmt"

func main() {
	// Initialize a map for the integer values
	ints := map[string]int64{
		"first":  34,
		"second": 12,
	}

	// Initialize a map for the float values
	floats := map[string]float64{
		"first":  35.98,
		"second": 26.99,
	}

	fmt.Printf("Non-Generic Sums: %v and %v\n", SumInts(ints), SumFloats(floats))
}

// SumInts adds together the values of m.
func SumInts(m map[string]int64) int64 {
	var s int64
	for _, v := range m {
		s += v
	}
	return s
}

// SumFloats adds together the values of m.
func SumFloats(m map[string]float64) float64 {
	var s float64
	for _, v := range m {
		s += v
	}
	return s
}
在这段代码中
- 声明了两个函数
SumInts()和SumFloats(),用于计算映射中所有值的和,值类型分别为int64和float64。 - 在
main()函数中初始化了一个int64值的映射和一个float64值的映射,调用上述两个函数计算值的和,并打印结果。
2.在generics目录中运行代码。
1
2
$ go run .
Non-Generic Sums: 46 and 62.97
5.3 添加泛型函数来处理多种类型
可以看到,SumInts()和SumFloats()这两个函数除了值类型外完全相同。在本节中,将编写一个泛型函数,能够处理包含整型或浮点型值的映射,从而用一个函数代替之前的两个函数。
泛型函数除了普通参数外还需要声明类型参数(type parameter),使其能够处理不同的类型。调用泛型函数时需要指定类型实参(type argument)。
每个类型参数都有一个类型约束(type constraint),用于指定允许使用的类型实参。类型约束通常表示一组类型(例如“int64和float64”),但在编译时类型参数仅代表单个类型,即调用代码提供的类型实参(例如“int64或float64之一”)。如果类型实参不满足类型约束,代码将无法编译。
类型参数必须支持泛型代码对其执行的所有操作。例如,如果函数试图对约束包含数值类型的类型参数执行字符串操作,代码将无法编译。
1.在main.go末尾添加以下代码:
1
2
3
4
5
6
7
8
9
// SumIntsOrFloats sums the values of map m.
// It supports both int64 and float64 as map values.
func SumIntsOrFloats[K comparable, V int64 | float64](m map[K]V) V {
	var s V
	for _, v := range m {
		s += v
	}
	return s
}
在这段代码中
- 声明了一个泛型函数
SumIntsOrFloats(),具有两个类型参数(在方括号中)K和V,参数类型为map[K]V,返回类型为V。 - 类型参数
K的约束为comparable,它允许任意支持比较运算符==和!=的类型。Go要求映射的键是可比较的。 - 类型参数
V的约束为两种类型的并集:int64和float64。使用|指定两种类型的并集,这意味着约束允许二者中任何一种类型。 - 参数
m的类型为map[K]V,这里使用了类型参数。
2.在main()函数末尾添加以下代码:
1
2
3
fmt.Printf("Generic Sums: %v and %v\n",
	SumIntsOrFloats[string, int64](ints),
	SumIntsOrFloats[string, float64](floats))
在这段代码中
- 分别使用两个映射调用了泛型函数
SumIntsOrFloats()。 - 在方括号中指定了类型实参,编译器会将类型参数替换为类型实参(例如
K=string, V=int64)。
3.运行代码。
1
2
3
$ go run .
Non-Generic Sums: 46 and 62.97
Generic Sums: 46 and 62.97
5.4 调用泛型函数时省略类型实参
在大多数情况下,可以省略泛型函数调用中的类型实参,编译器能够根据函数参数自动推断。注意,这并不总是可行的。例如,如果需要调用一个无参数的泛型函数,就需要显式指定类型实参。
在main()函数末尾添加以下代码:
1
2
3
fmt.Printf("Generic Sums, type parameters inferred: %v and %v\n",
	SumIntsOrFloats(ints),
	SumIntsOrFloats(floats))
运行代码:
1
2
3
4
$ go run .
Non-Generic Sums: 46 and 62.97
Generic Sums: 46 and 62.97
Generic Sums, type parameters inferred: 46 and 62.97
5.5 声明类型约束
在本节中,将把之前定义的类型约束移到接口中,以便在其他地方复用。
可以将类型约束声明为接口,该约束将允许任何实现了该接口的类型。例如,如果声明一个包含三个方法的类型约束接口,然后将其用于泛型函数的类型参数,那么用于调用该函数的类型实参必须实现这三个方法。(直接使用接口类型的函数参数也能实现同样的效果?)
类型约束接口也可以引用特定的类型,如下所示。
1.在main()函数上方添加以下代码:
1
2
3
type Number interface {
	int64 | float64
}
这段代码声明了用作类型约束的接口类型Number,定义为int64和float64的并集。
2.在main.go末尾添加以下代码:
1
2
3
4
5
6
7
8
9
// SumNumbers sums the values of map m.
// It supports both int64 and float64 as map values.
func SumNumbers[K comparable, V Number](m map[K]V) V {
	var s V
	for _, v := range m {
		s += v
	}
	return s
}
这段代码声明了一个泛型函数SumNumbers(),逻辑与之前的SumIntsOrFloats()相同,但使用了接口而不是类型并集作为类型约束。
3.在main()函数末尾添加以下代码:
1
2
3
fmt.Printf("Generic Sums with Constraint: %v and %v\n",
	SumNumbers(ints),
	SumNumbers(floats))
4.运行代码。
1
2
3
4
5
$ go run .
Non-Generic Sums: 46 and 62.97
Generic Sums: 46 and 62.97
Generic Sums, type parameters inferred: 46 and 62.97
Generic Sums with Constraint: 46 and 62.97
完整代码:generics/main.go
6.访问数据库
Tutorial: Accessing a relational database
本教程将介绍如何使用Go访问关系型数据库。在本教程中,将创建一个复古爵士乐唱片的数据库,然后编写访问该数据库的代码。
标准库的database/sql包包含用于连接数据库、执行查询等操作的类型和函数。详见Accessing relational databases。
6.1 前置条件
安装MySQL数据库。
6.2 创建目录
创建一个data-access模块。
1
2
3
mkdir data-access
cd data-access
go mod init example/data-access
6.3 创建数据库
使用MySQL命令行客户端创建一个复古爵士乐唱片数据库。
1.打开一个命令行窗口,登录到MySQL。
1
2
3
4
$ mysql -u root -p
Enter password:

mysql>
2.在mysql命令行中创建一个数据库recordings,并切换到该数据库。
1
2
3
4
5
mysql> create database recordings;
Query OK, 1 row affected (0.02 sec)

mysql> use recordings;
Database changed
3.在data-access目录中创建一个文件create-tables.sql,内容如下:
1
2
3
4
5
6
7
8
9
10
11
12
13
14
15
16
DROP TABLE IF EXISTS album;
CREATE TABLE album (
  id         INT AUTO_INCREMENT NOT NULL,
  title      VARCHAR(128) NOT NULL,
  artist     VARCHAR(255) NOT NULL,
  price      DECIMAL(5,2) NOT NULL,
  PRIMARY KEY (`id`)
);

INSERT INTO album
  (title, artist, price)
VALUES
  ('Blue Train', 'John Coltrane', 56.99),
  ('Giant Steps', 'John Coltrane', 63.99),
  ('Jeru', 'Gerry Mulligan', 17.99),
  ('Sarah Vaughan', 'Sarah Vaughan', 34.98);
在这段SQL代码中
- 删除名为
album的表,以便可以重复运行这个脚本。 - 创建了一张表
album,包含4列:id、title、artist和price。其中id是自动递增的。 - 向
album表插入了4行记录。
4.在mysql命令行中使用source命令运行这个SQL脚本:
1
mysql> source data-access/create-tables.sql
注意:在Windows中,文件路径要使用正斜杠而不是反斜杠,例如 C:/Users/yourname/data-access/create-tables.sql
5.使用SELECT语句验证成功创建了表和数据。
1
2
3
4
5
6
7
8
9
10
mysql> select * from album;
+----+---------------+----------------+-------+
| id | title         | artist         | price |
+----+---------------+----------------+-------+
|  1 | Blue Train    | John Coltrane  | 56.99 |
|  2 | Giant Steps   | John Coltrane  | 63.99 |
|  3 | Jeru          | Gerry Mulligan | 17.99 |
|  4 | Sarah Vaughan | Sarah Vaughan  | 34.98 |
+----+---------------+----------------+-------+
4 rows in set (0.00 sec)
6.4 查找数据库驱动
接下来,需要寻找一个能够将database/sql包中的函数调用转换为数据库可理解的请求的数据库驱动。
1.在浏览器打开SQL Database Drivers。
2.在本教程中,使用github.com/go-sql-driver/mysql来访问MySQL(注意,仓库的URL就是模块名)。
3.在data-access目录中创建一个文件main.go并添加以下代码:
1
2
3
package main

import "github.com/go-sql-driver/mysql"
4.使用go get命令将github.com/go-sql-driver/mysql模块作为依赖添加到go.mod文件,并下载该依赖。
1
2
3
$ go get .
go: added filippo.io/edwards25519 v1.1.0
go: added github.com/go-sql-driver/mysql v1.9.3
其中.表示“为当前目录中的代码获取依赖”。详见Adding a dependency。
注:也可以先使用go get github.com/go-sql-driver/mysql命令下载依赖,然后在代码中导入,最后执行go mod tidy。
6.5 连接数据库
导入驱动后,就可以开始编写访问数据库的代码了。
1.在main.go中添加以下代码:
1
2
3
4
5
6
7
8
9
10
11
12
13
14
15
16
17
18
19
20
21
22
23
24
var db *sql.DB

func main() {
	// Capture connection properties.
	cfg := mysql.NewConfig()
	cfg.User = os.Getenv("DBUSER")
	cfg.Passwd = os.Getenv("DBPASS")
	cfg.Net = "tcp"
	cfg.Addr = "127.0.0.1:3306"
	cfg.DBName = "recordings"

	// Get a database handle.
	var err error
	db, err = sql.Open("mysql", cfg.FormatDSN())
	if err != nil {
		log.Fatal(err)
	}

	pingErr := db.Ping()
	if pingErr != nil {
		log.Fatal(pingErr)
	}
	fmt.Println("Connected!")
}
在这段代码中
- 声明了一个
*sql.DB类型的全局变量db。sql.DB类型表示数据库句柄(handle),可用于访问数据库。在实际代码中,应该避免全局变量,而是通过函数参数传递。 - 使用MySQL驱动的Config类型收集连接参数,并使用
FormatDSN()方法将其格式化为DSN (data source name)字符串。 - 调用
sql.Open()打开数据库连接,如果失败则打印错误消息。 - 调用
DB.Ping()确认连接成功并打印消息 “Connected!” 。
2.在命令行中设置程序使用的环境变量DBUSER和DBPASS,指定数据库用户名和密码。
在Linux或Mac上:
1
2
export DBUSER=username
export DBPASS=password
在Windows上:
1
2
set DBUSER=username
set DBPASS=password
3.在data-access目录中运行代码。
1
2
$ go run .
Connected!
6.6 查询多行
接下来将使用Go执行一个SQL查询。对于可能返回多行的SQL语句,使用DB.Query()方法执行查询,并遍历它返回的行。
1.在main()函数上方添加Album结构体的定义,用于保存查询返回的行数据。结构体字段名和类型与数据库表album的列名和类型对应。
1
2
3
4
5
6
type Album struct {
	ID     int64
	Title  string
	Artist string
	Price  float32
}
2.在main()函数下方添加albumsByArtist()函数,用于根据艺术家名字查询专辑。
1
2
3
4
5
6
7
8
9
10
11
12
13
14
15
16
17
18
19
20
21
22
23
// albumsByArtist queries for albums that have the specified artist name.
func albumsByArtist(name string) ([]Album, error) {
	// An albums slice to hold data from returned rows.
	var albums []Album

	rows, err := db.Query("SELECT * FROM album WHERE artist = ?", name)
	if err != nil {
		return nil, fmt.Errorf("albumsByArtist %q: %v", name, err)
	}
	defer rows.Close()
	// Loop through rows, using Scan to assign column data to struct fields.
	for rows.Next() {
		var alb Album
		if err := rows.Scan(&alb.ID, &alb.Title, &alb.Artist, &alb.Price); err != nil {
			return nil, fmt.Errorf("albumsByArtist %q: %v", name, err)
		}
		albums = append(albums, alb)
	}
	if err := rows.Err(); err != nil {
		return nil, fmt.Errorf("albumsByArtist %q: %v", name, err)
	}
	return albums, nil
}
在这段代码中
- 声明了一个
Album类型的切片albums,用于保存查询结果。 - 使用
DB.Query()执行SELECT语句来查询具有指定艺术家名字的专辑。第一个参数是SQL语句,之后可以传递零个或多个任意类型的参数,用于提供SQL语句中占位符(?)的值。与直接拼接字符串相比,这种方式可以避免SQL注入风险。 - 使用
defer语句关闭rows,以便在函数退出时释放它持有的资源。 - 使用
for语句遍历返回的行,使用Rows.Scan()将每行各个列的值赋给Album的字段。Scan()接受一个指针列表,用于写入列的值。这里使用&运算符获取alb变量各字段的指针。- 在Go中,只有条件部分的
for循环相当于Java中的while循环。Rows.Next()返回一个布尔值,表示是否还有下一行。
- 在循环内部,将新的
alb添加到albums切片。 - 循环结束后,使用
Rows.Err()检查整个查询是否有错误。注意,如果查询本身失败了,在这里检查错误是发现结果不完整的唯一方式。
3.在main()函数末尾调用albumsByArtist()函数并打印结果。
1
2
3
4
5
albums, err := albumsByArtist("John Coltrane")
if err != nil {
	log.Fatal(err)
}
fmt.Printf("Albums found: %v\n", albums)
4.运行代码。
1
2
3
$ go run .
Connected!
Albums found: [{1 Blue Train John Coltrane 56.99} {2 Giant Steps John Coltrane 63.99}]
6.7 查询一行
对于至多会返回一行的SQL语句,可以使用QueryRow(),这比Query()循环更简单。
1.在albumsByArtist()函数下方添加albumByID()函数,用于根据ID查询专辑。
1
2
3
4
5
6
7
8
9
10
11
12
13
14
// albumByID queries for the album with the specified ID.
func albumByID(id int64) (Album, error) {
	// An album to hold data from the returned row.
	var alb Album

	row := db.QueryRow("SELECT * FROM album WHERE id = ?", id)
	if err := row.Scan(&alb.ID, &alb.Title, &alb.Artist, &alb.Price); err != nil {
		if err == sql.ErrNoRows {
			return alb, fmt.Errorf("albumsById %d: no such album", id)
		}
		return alb, fmt.Errorf("albumsById %d: %v", id, err)
	}
	return alb, nil
}
在这段代码中
- 使用
DB.QueryRow()执行SELECT语句来查询具有指定ID的专辑(ID是唯一的,因此至多会返回一行),返回一个sql.Row。为了简化调用代码,该方法不返回错误,而是之后在Rows.Scan()中返回查询错误(例如sql.ErrNoRows)。 - 使用
Rows.Scan()将列值拷贝到结构体字段,并检查错误。特殊错误sql.ErrNoRows表示查询未返回任何行。 - 在Go中,结构体类型的值不能为
nil,因此在发生错误时仍然需要返回alb(此时所有字段都是零值)。
2.在main()函数末尾调用albumByID()函数并打印结果。
1
2
3
4
5
6
// Hard-code ID 2 here to test the query.
alb, err := albumByID(2)
if err != nil {
	log.Fatal(err)
}
fmt.Printf("Album found: %v\n", alb)
3.运行代码。
1
2
3
4
$ go run .
Connected!
Albums found: [{1 Blue Train John Coltrane 56.99} {2 Giant Steps John Coltrane 63.99}]
Album found: {2 Giant Steps John Coltrane 63.99}
6.8 插入数据
在本节中,将使用Go执行INSERT语句来向数据库添加新行。为了执行不返回结果的SQL语句,需要使用DB.Exec()。
1.在albumByID()函数下方添加addAlbum()函数,用于在数据库中插入一个新的专辑。
1
2
3
4
5
6
7
8
9
10
11
12
13
14
// addAlbum adds the specified album to the database,
// returning the album ID of the new entry
func addAlbum(alb Album) (int64, error) {
	result, err := db.Exec("INSERT INTO album (title, artist, price) VALUES (?, ?, ?)",
		alb.Title, alb.Artist, alb.Price)
	if err != nil {
		return 0, fmt.Errorf("addAlbum: %v", err)
	}
	id, err := result.LastInsertId()
	if err != nil {
		return 0, fmt.Errorf("addAlbum: %v", err)
	}
	return id, nil
}
在这段代码中
- 使用
DB.Exec()执行了INSERT语句。与Query()类似,Exec()也接受一个SQL语句和若干个参数值。 - 该方法返回一个
sql.Result,使用其LastInsertId()方法获取插入到数据库的行ID。
2.在main()函数末尾调用addAlbum()函数并打印结果。
1
2
3
4
5
6
7
8
9
albID, err := addAlbum(Album{
	Title:  "The Modern Sound of Betty Carter",
	Artist: "Betty Carter",
	Price:  49.99,
})
if err != nil {
	log.Fatal(err)
}
fmt.Printf("ID of added album: %v\n", albID)
3.运行代码。
1
2
3
4
5
$ go run .
Connected!
Albums found: [{1 Blue Train John Coltrane 56.99} {2 Giant Steps John Coltrane 63.99}]
Album found: {2 Giant Steps John Coltrane 63.99}
ID of added album: 5
完整代码:data-access/main.go
7.开发RESTful API
Tutorial: Developing a RESTful API with Go and Gin
本教程将介绍如何使用Go和Gin框架编写一个RESTful API Web服务。该服务包含复古爵士乐唱片数据,提供三个API:
- 返回所有专辑
- 添加一个新专辑
- 返回具有指定ID的专辑
注:这个服务与教程“访问数据库”中的程序功能基本相同,只是由命令行接口改为Web服务。
7.1 设计API
在开发Web服务时,通常从设计API端点(endpoint)开始。本教程中的Web服务有以下端点:
/albums- GET - 获得所有专辑的列表,以JSON格式返回
- POST - 添加一个新专辑,请求数据以JSON格式发送
/albums/:id- GET - 按ID获得一个专辑,以JSON格式返回
7.2 创建目录
创建一个web-service-gin模块。
1
2
3
mkdir web-service-gin
cd web-service-gin
go mod init example/web-service-gin
7.3 创建数据
为了简单起见,本教程将数据存储在内存中。这意味着每次停止服务器时数据就会丢失,启动服务器时再重新创建。在实际中通常使用数据库。
1.在web-service-gin目录中创建一个文件main.go并添加包声明:
1
package main
2.在包声明下方,添加album结构体的声明,用于在内存中存储专辑数据。
1
2
3
4
5
6
7
// album represents data about a record album.
type album struct {
	ID     string  `json:"id"`
	Title  string  `json:"title"`
	Artist string  `json:"artist"`
	Price  float64 `json:"price"`
}
像json:"artist"这样的标签指定了当结构体的内容序列化为JSON时的字段名。如果未指定则使用结构体字段名,但首字母大写的风格在JSON中并不常见(注:首字母不大写的字段是非导出的,不会包含在JSON字符串中)。
3.在结构体声明下方,添加以下包含初始数据的切片。
1
2
3
4
5
6
// albums slice to seed record album data.
var albums = []album{
	{ID: "1", Title: "Blue Train", Artist: "John Coltrane", Price: 56.99},
	{ID: "2", Title: "Jeru", Artist: "Gerry Mulligan", Price: 17.99},
	{ID: "3", Title: "Sarah Vaughan and Clifford Brown", Artist: "Sarah Vaughan", Price: 39.99},
}
7.4 编写返回所有项的API
接下来开始实现第一个API:当客户端请求GET /albums时,以JSON格式返回所有专辑。为此需要编写以下代码:
- 生成响应数据的函数
- 将请求路径映射到上述函数
1.在包声明下方添加导入github.com/gin-gonic/gin模块的import语句:
1
import "github.com/gin-gonic/gin"
2.在命令行中执行go get命令,将github.com/gin-gonic/gin模块添加为当前模块的依赖,并下载该依赖。
1
2
$ go get .
go: added github.com/gin-gonic/gin v1.11.0
3.在专辑数据下方添加getAlbums()函数,用于将album切片序列化为JSON字符串,并将其写入响应体。这种函数称为处理器(handler)。
1
2
3
4
// getAlbums responds with the list of all albums as JSON.
func getAlbums(c *gin.Context) {
	c.IndentedJSON(http.StatusOK, albums)
}
在这段代码中
- 编写了一个
getAlbums()函数,接受一个gin.Context指针参数。这个类型是Gin框架最重要的部分,用于携带请求信息、验证和序列化JSON、发送响应等。 - 调用
Context.IndentedJSON()将album切片序列化为JSON并添加到响应。第一个参数是HTTP状态码,这里使用net/http包中的StatusOK常量表示200 OK。
4.在getAlbums()函数上方添加main()函数:
1
2
3
4
5
6
func main() {
	router := gin.Default()
	router.GET("/albums", getAlbums)

	router.Run("localhost:8080")
}
在这段代码中
- 使用
gin.Default()初始化了一个Gin路由器。 - 使用
GET()将路径/albums的GET请求关联到handler函数getAlbums。注意这里传递的是函数名,没有括号。 - 使用
Run()将路由器附加到一个http.Server并启动服务器。
5.在web-service-gin目录中运行代码,这会启动一个HTTP服务器。
1
2
$ go run .
[GIN-debug] Listening and serving HTTP on localhost:8080
6.打开一个新的命令行窗口,使用curl命令向Web服务发送请求,将会显示API返回的响应。
1
2
3
4
5
6
7
8
9
10
11
12
13
14
15
16
17
18
19
20
21
$ curl http://localhost:8080/albums
[
    {
        "id": "1",
        "title": "Blue Train",
        "artist": "John Coltrane",
        "price": 56.99
    },
    {
        "id": "2",
        "title": "Jeru",
        "artist": "Gerry Mulligan",
        "price": 17.99
    },
    {
        "id": "3",
        "title": "Sarah Vaughan and Clifford Brown",
        "artist": "Sarah Vaughan",
        "price": 39.99
    }
]
注:Windows系统可以直接在浏览器中访问 http://localhost:8080/albums 。
7.5 编写添加新项的API
当客户端请求POST /albums时,向现有专辑数据中添加一张新专辑,其内容来自请求体。
1.在getAlbums()函数下方添加postAlbums()函数:
1
2
3
4
5
6
7
8
9
10
11
12
13
// postAlbums adds an album from JSON received in the request body.
func postAlbums(c *gin.Context) {
	var newAlbum album

	// Call BindJSON to bind the received JSON to newAlbum.
	if err := c.BindJSON(&newAlbum); err != nil {
		return
	}

	// Add the new album to the slice.
	albums = append(albums, newAlbum)
	c.IndentedJSON(http.StatusCreated, newAlbum)
}
在这段代码中
- 使用
Context.BindJSON()将请求体中的JSON字符串解析为album结构体,并绑定到变量newAlbum。 - 将
newAlbum添加到albums切片。 - 返回201状态码以及新添加专辑的JSON表示。
2.修改main()函数,将路径/albums的POST请求关联到postAlbums()函数:
1
router.POST("/albums", postAlbums)
3.如果之前的服务器仍在运行,按Ctrl+C停止,然后重新启动服务器。
1
$ go run .
4.在另一个命令行窗口中使用curl发送POST请求。
1
2
3
4
5
6
7
8
9
10
11
12
13
14
15
16
$ curl http://localhost:8080/albums \
    --include \
    --header "Content-Type: application/json" \
    --request "POST" \
    --data '{"id": "4","title": "The Modern Sound of Betty Carter","artist": "Betty Carter","price": 49.99}'
HTTP/1.1 201 Created
Content-Type: application/json; charset=utf-8
Date: Wed, 02 Jun 2021 00:34:12 GMT
Content-Length: 116

{
    "id": "4",
    "title": "The Modern Sound of Betty Carter",
    "artist": "Betty Carter",
    "price": 49.99
}
该命令将打印响应header和新的专辑。
注:浏览器无法直接发送POST请求。在Windows上可以使用Postman。
5.像上一节一样获取所有专辑的列表,确认新专辑已被添加。
1
2
3
4
5
6
7
8
9
10
11
12
13
14
15
16
17
18
19
20
21
22
23
24
25
26
27
$ curl http://localhost:8080/albums
[
    {
        "id": "1",
        "title": "Blue Train",
        "artist": "John Coltrane",
        "price": 56.99
    },
    {
        "id": "2",
        "title": "Jeru",
        "artist": "Gerry Mulligan",
        "price": 17.99
    },
    {
        "id": "3",
        "title": "Sarah Vaughan and Clifford Brown",
        "artist": "Sarah Vaughan",
        "price": 39.99
    },
    {
        "id": "4",
        "title": "The Modern Sound of Betty Carter",
        "artist": "Betty Carter",
        "price": 49.99
    }
]
7.6 编写返回特定项的API
下面实现最后一个API:当客户端请求GET /albums/:id时,返回ID与路径参数id匹配的专辑。
1.在postAlbums()函数下方添加getAlbumByID()函数:
1
2
3
4
5
6
7
8
9
10
11
12
13
14
15
// getAlbumByID locates the album whose ID value matches the id
// parameter sent by the client, then returns that album as a response.
func getAlbumByID(c *gin.Context) {
	id := c.Param("id")

	// Loop over the list of albums, looking for
	// an album whose ID value matches the parameter.
	for _, a := range albums {
		if a.ID == id {
			c.IndentedJSON(http.StatusOK, a)
			return
		}
	}
	c.IndentedJSON(http.StatusNotFound, gin.H{"message": "album not found"})
}
在这段代码中
- 使用
Context.Param()从URL获取路径参数id(对应路径中的占位符:id)。 - 遍历
album切片,查找ID字段与id参数值匹配的专辑。如果找到,则将其序列化为JSON,并返回HTTP状态码200;否则返回状态码404。
2.修改main()函数,将路径/albums/:id的GET请求关联到getAlbumByID()函数:
1
router.GET("/albums/:id", getAlbumByID)
在Gin中,路径中以:开头的部分表示路径参数。
3.重启服务器,使用curl查询ID=2的专辑。
1
2
3
4
5
6
7
$ curl http://localhost:8080/albums/2
{
    "id": "2",
    "title": "Jeru",
    "artist": "Gerry Mulligan",
    "price": 17.99
}
8.编写Web应用
本教程将实现一个用于编辑Wiki页面的Web应用。包括:
- 创建一个具有加载和保存方法的数据结构。
- 使用
net/http包构建Web应用。 - 使用
html/template包处理HTML模板。 - 使用
regexp包验证用户输入。 - 使用闭包。
8.1 创建目录
创建一个gowiki目录。
1
2
mkdir gowiki
cd gowiki
在其中创建一个名为wiki.go的文件,内容如下:
1
2
3
4
5
6
package main

import (
	"fmt"
	"os"
)
8.2 数据结构
首先从定义数据结构开始。Wiki由一系列相互链接的页面组成,每个页面都有标题和正文(页面内容)。
定义结构体Page,具有标题和正文两个字段:
1
2
3
4
type Page struct {
	Title string
	Body  []byte
}
Body字段的类型为[]byte而不是string,因为这是我们要使用的io包所期望的类型。
Page结构体描述了页面数据如何存储在内存中。为了持久化,我们为Page定义一个save()方法:
1
2
3
4
func (p *Page) save() error {
	filename := p.Title + ".txt"
	return os.WriteFile(filename, p.Body, 0600)
}
该方法将页面保存到文本文件,使用标题作为文件名。
save()方法返回一个error值,这是WriteFile()函数的返回值。如果写文件时发生错误,save()方法就会返回这个错误值以便应用程序处理。如果保存成功,该方法将返回nil(指针、接口等类型的零值)。
WriteFile()的第3个参数八进制整数0600表示文件仅对当前用户具有读写权限(即rw-------)。
除了保存页面,还需要加载页面:
1
2
3
4
5
6
7
8
func loadPage(title string) (*Page, error) {
	filename := title + ".txt"
	body, err := os.ReadFile(filename)
	if err != nil {
		return nil, err
	}
	return &Page{Title: title, Body: body}, nil
}
loadPage()函数根据title参数构造文件名,将文件内容读取到body变量。如果读取失败(例如文件不存在),则返回错误值;否则使用title和body构造一个Page并返回指向它的指针。
现在已经有了一个简单的数据结构,以及保存到文件和从文件加载的方法。下面编写一个main()函数来测试这些功能。
1
2
3
4
5
6
func main() {
	p1 := &Page{Title: "TestPage", Body: []byte("This is a sample Page.")}
	p1.save()
	p2, _ := loadPage("TestPage")
	fmt.Println(string(p2.Body))
}
编译并运行这段代码,将会创建一个名为TestPage.txt的文件,其内容为 “This is a sample Page.” ,然后读取其内容并打印到屏幕。
在gowiki目录中执行以下命令:
1
2
3
$ go build wiki.go
$ ./wiki
This is a sample Page.
(在Windows上不添加./)
到目前为止的代码:gowiki/wiki.go (part1)
8.3 插曲:net/http包简介
下面是一个简单Web服务器的完整示例:
1
2
3
4
5
6
7
8
9
10
11
12
13
14
15
16
package main

import (
	"fmt"
	"log"
	"net/http"
)

func handler(w http.ResponseWriter, r *http.Request) {
	fmt.Fprintf(w, "Hi there, I love %s!", r.URL.Path[1:])
}

func main() {
	http.HandleFunc("/", handler)
	log.Fatal(http.ListenAndServe(":8080", nil))
}
main()函数首先调用http.HandleFunc(),告诉http包用函数handler()处理所有以"/"开头的请求。
之后调用http.ListenAndServe(),并指定监听8080端口(暂时忽略第二个参数)。该函数将会阻塞直到程序被终止。
ListenAndServe()总是会返回一个error,因为它只有在发生意外错误时才会返回。使用log.Fatal()函数将错误输出到日志。
函数handler()是HandlerFunc类型,即接受一个http.ResponseWriter和一个http.Request指针参数的函数:
1
type HandlerFunc func(ResponseWriter, *Request)
http.ResponseWriter用于生成HTTP服务器的响应,通过向它写入数据即可将数据发送到HTTP客户端。
http.Request是表示HTTP客户端请求的数据结构。r.URL.Path是请求的URL字符串,[1:]表示忽略开头的 “/” 。
运行该程序并访问URL http://localhost:8080/monkeys ,响应页面将包含
1
Hi there, I love monkeys!
注:另见【Go】net/http包源码解读。
8.4 使用net/http包提供wiki页面服务
为了使用net/http包,必须导入它:
1
import "net/http"
创建一个函数viewHandler(),允许用户查看一个wiki页面。它处理以"/view/"开头的URL。
1
2
3
4
5
func viewHandler(w http.ResponseWriter, r *http.Request) {
	title := r.URL.Path[len("/view/"):]
	p, _ := loadPage(title)
	fmt.Fprintf(w, "<h1>%s</h1><div>%s</div>", p.Title, p.Body)
}
首先,该函数从URL路径r.URL.Path中提取页面标题,并删除开头的"/view/"。
然后加载页面数据,用一个简单的HTML字符串格式化页面,并将其写入http.ResponseWriter。为了简单起见,这里使用_忽略了loadPage()返回的错误。这是不好的做法,稍后会处理这个问题。
为了使用这个handler,修改main()函数,使用viewHandler()来处理以"/view/"开头的URL。
1
2
3
4
func main() {
	http.HandleFunc("/view/", viewHandler)
	log.Fatal(http.ListenAndServe(":8080", nil))
}
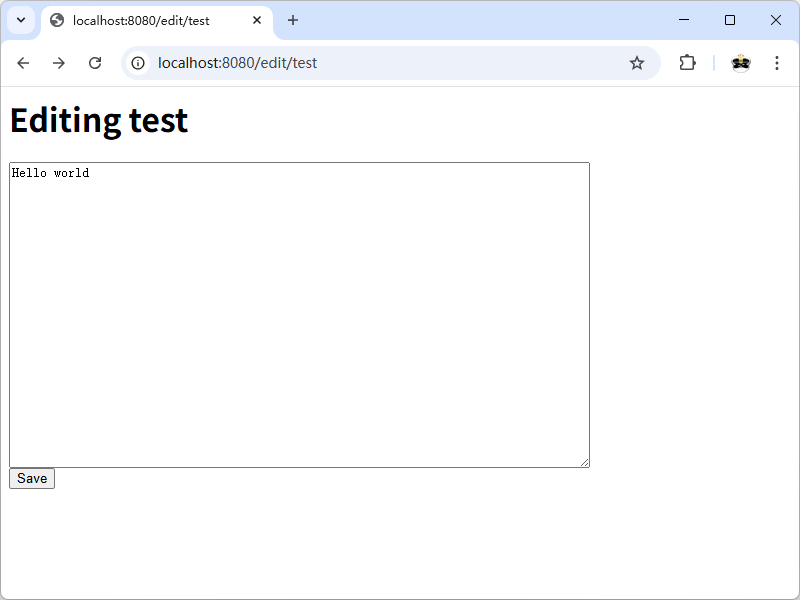
下面手动创建一个页面文件,并尝试查看wiki页面。创建一个文件test.txt,内容为 “Hello world” 。然后编译代码并启动服务器:
1
2
$ go build wiki.go
$ ./wiki
在浏览器中访问 http://localhost:8080/view/test ,将会显示以下页面。

到目前为止的代码:gowiki/wiki.go (part2)
8.5 编辑页面
没有编辑页面能力的wiki不叫wiki。下面创建两个新的handler:
editHandler()用于显示“编辑页面”表单。saveHandler()用于保存通过表单输入的数据。
首先将其添加到main()函数:
1
2
3
4
5
6
func main() {
	http.HandleFunc("/view/", viewHandler)
	http.HandleFunc("/edit/", editHandler)
	http.HandleFunc("/save/", saveHandler)
	log.Fatal(http.ListenAndServe(":8080", nil))
}
editHandler()函数加载对应的页面(如果不存在则创建一个空的Page结构体),并显示一个HTML表单。
1
2
3
4
5
6
7
8
9
10
11
12
13
func editHandler(w http.ResponseWriter, r *http.Request) {
	title := r.URL.Path[len("/edit/"):]
	p, err := loadPage(title)
	if err != nil {
		p = &Page{Title: title}
	}
	fmt.Fprintf(w, "<h1>Editing %s</h1>"+
		"<form action=\"/save/%s\" method=\"POST\">"+
		"<textarea name=\"body\">%s</textarea><br>"+
		"<input type=\"submit\" value=\"Save\">"+
		"</form>",
		p.Title, p.Title, p.Body)
}
在浏览器中访问 http://localhost:8080/edit/test ,将显示以下编辑表单页面。
这个函数可以正常工作,但硬编码的HTML很丑陋。更好的方式是使用模板。
8.6 html/template包
html/template包是Go标准库的一部分。使用它可以将HTML模板保存在单独的文件中,从而在不修改底层Go代码的情况下更改HTML页面的布局。
首先要导入html/template包:
1
import "html/template"
创建一个包含HTML表单的模板文件edit.html文件,内容如下:
1
2
3
4
5
6
<h1>Editing {{.Title}}</h1>

<form action="/save/{{.Title}}" method="POST">
    <div><textarea name="body" rows="20" cols="80">{{printf "%s" .Body}}</textarea></div>
    <div><input type="submit" value="Save"></div>
</form>
修改editHandler()函数,使其使用该模板而不是硬编码的HTML:
1
2
3
4
5
6
7
8
9
func editHandler(w http.ResponseWriter, r *http.Request) {
	title := r.URL.Path[len("/edit/"):]
	p, err := loadPage(title)
	if err != nil {
		p = &Page{Title: title}
	}
	t, _ := template.ParseFiles("edit.html")
	t.Execute(w, p)
}
函数template.ParseFiles()会读取edit.html的内容并返回一个*template.Template。
t.Execute()方法执行(渲染)模板,并将生成的HTML写入http.ResponseWriter。模板中的.Title和.Body分别引用p.Title和p.Body。
模板指令(template directive)用两个花括号括起来。指令printf "%s" .Body是一个函数调用,用于将.Body输出为字符串(等同于fmt.Printf())。html/template包会保证生成正确的HTML。例如,它会自动转义>字符,将其替换为>。
接下来,为viewHandler()也创建模板view.html:
1
2
3
4
5
<h1>{{.Title}}</h1>

<p>[<a href="/edit/{{.Title}}">edit</a>]</p>

<div>{{printf "%s" .Body}}</div>
相应地修改viewHandler():
1
2
3
4
5
6
func viewHandler(w http.ResponseWriter, r *http.Request) {
	title := r.URL.Path[len("/view/"):]
	p, _ := loadPage(title)
	t, _ := template.ParseFiles("view.html")
	t.Execute(w, p)
}
注意,在这两个handler函数中使用了几乎完全相同的模板代码。可以将模板代码抽取成单独的函数来消除重复:
1
2
3
4
5
6
7
8
9
10
11
12
13
14
15
16
17
18
19
func renderTemplate(w http.ResponseWriter, tmpl string, p *Page) {
	t, _ := template.ParseFiles(tmpl + ".html")
	t.Execute(w, p)
}

func viewHandler(w http.ResponseWriter, r *http.Request) {
	title := r.URL.Path[len("/view/"):]
	p, _ := loadPage(title)
	renderTemplate(w, "view", p)
}

func editHandler(w http.ResponseWriter, r *http.Request) {
	title := r.URL.Path[len("/edit/"):]
	p, err := loadPage(title)
	if err != nil {
		p = &Page{Title: title}
	}
	renderTemplate(w, "edit", p)
}
到目前为止的代码:gowiki/wiki.go (part3)
8.7 处理不存在的页面
如果访问不存在的页面(例如 http://localhost:8080/view/APageThatDoesntExist ),将会看到一个空白页。这是因为viewHandler()忽略了loadPage()的错误返回值,并继续尝试渲染没有数据的模板。
如果请求的页面不存在,应该将客户端重定向到编辑页面,以便创建内容:
1
2
3
4
5
6
7
8
9
func viewHandler(w http.ResponseWriter, r *http.Request) {
	title := r.URL.Path[len("/view/"):]
	p, err := loadPage(title)
	if err != nil {
		http.Redirect(w, r, "/edit/"+title, http.StatusFound)
		return
	}
	renderTemplate(w, "view", p)
}
http.Redirect()函数会向HTTP响应添加状态码http.StatusFound (302)和Location标头(重定向位置)。
8.8 保存页面
saveHandler()函数用于处理编辑页面提交的表单:
1
2
3
4
5
6
7
func saveHandler(w http.ResponseWriter, r *http.Request) {
	title := r.URL.Path[len("/save/"):]
	body := r.FormValue("body")
	p := &Page{Title: title, Body: []byte(body)}
	p.save()
	http.Redirect(w, r, "/view/"+title, http.StatusFound)
}
该函数创建了一个新的Page,Title由URL提供,Body来自表单唯一的字段body。然后调用save()方法将数据写入文件,并将客户端重定向到/view/页面。
FormValue()的返回值是string类型,需要使用[]byte(body)将其转换为[]byte类型。
8.9 错误处理
目前的程序中有几个地方忽略了错误。这是种不好的做法,因为当确实发生错误时,程序会有意外的行为。更好的做法是处理错误并向用户返回错误消息。
首先处理renderTemplate()中的错误:
1
2
3
4
5
6
7
8
9
10
11
func renderTemplate(w http.ResponseWriter, tmpl string, p *Page) {
	t, err := template.ParseFiles(tmpl + ".html")
	if err != nil {
		http.Error(w, err.Error(), http.StatusInternalServerError)
		return
	}
	err = t.Execute(w, p)
	if err != nil {
		http.Error(w, err.Error(), http.StatusInternalServerError)
	}
}
http.Error()函数发送指定的HTTP状态码(这里是 “500 Internal Server Error” )和错误消息。
接下来修正saveHandler():
1
2
3
4
5
6
7
8
9
10
11
func saveHandler(w http.ResponseWriter, r *http.Request) {
	title := r.URL.Path[len("/save/"):]
	body := r.FormValue("body")
	p := &Page{Title: title, Body: []byte(body)}
	err := p.save()
	if err != nil {
		http.Error(w, err.Error(), http.StatusInternalServerError)
		return
	}
	http.Redirect(w, r, "/view/"+title, http.StatusFound)
}
8.10 模板缓存
目前的代码有一个效率低的地方:renderTemplate()在每次渲染页面时都会调用ParseFiles()。一种更好的方式是在程序初始化时调用一次ParseFiles(),将所有模板解析为单个 *Template。然后可以使用ExecuteTemplate()方法渲染特定的模板。
首先创建一个名为templates的全局变量,并使用ParseFiles()对其进行初始化。
1
var templates = template.Must(template.ParseFiles("edit.html", "view.html"))
template.Must()是一个辅助函数,当传递非nil错误值时会导致panic,否则直接返回传入的*Template。在这里panic是合适的:如果无法加载模板,唯一合理的做法就是退出程序(相当于exit(1))。
ParseFiles()函数接受任意数量的字符串参数(模板文件名),将这些文件解析为以文件名命名的模板。
之后修改renderTemplate()函数,使用特定的模板名称调用templates.ExecuteTemplate()方法:
1
2
3
4
5
6
func renderTemplate(w http.ResponseWriter, tmpl string, p *Page) {
	err := templates.ExecuteTemplate(w, tmpl+".html", p)
	if err != nil {
		http.Error(w, err.Error(), http.StatusInternalServerError)
	}
}
8.11 验证
这个程序有一个严重的安全缺陷:用户可以提供任意路径在服务器上进行读/写(例如,访问/view//usr/local/foo就能够读取文件 /usr/local/foo.txt)。为了解决这一问题,可以编写一个函数,用正则表达式来验证标题。
首先,导入regexp包。然后创建一个全局变量来存储验证表达式:
1
var validPath = regexp.MustCompile("^/(edit|save|view)/([a-zA-Z0-9]+)$")
函数regexp.MustCompile()会解析并编译正则表达式,返回一个regexp.Regexp。MustCompile()与Compile()的区别是:如果表达式编译失败,前者会导致panic,而后者会返回一个error。
接下来编写一个函数,使用validPath来验证URL并提取页面标题:
1
2
3
4
5
6
7
8
func getTitle(w http.ResponseWriter, r *http.Request) (string, error) {
	m := validPath.FindStringSubmatch(r.URL.Path)
	if m == nil {
		http.NotFound(w, r)
		return "", errors.New("invalid page title")
	}
	return m[2], nil // The title is the second subexpression.
}
如果标题合法,则返回标题和nil错误值。如果标题不合法,则向HTTP连接写入 “404 Not Found” 错误,并返回一个错误值。
在每个handler函数中调用getTitle():
1
2
3
4
5
6
7
8
9
10
11
12
13
14
15
16
17
18
19
20
21
22
23
func viewHandler(w http.ResponseWriter, r *http.Request) {
	title, err := getTitle(w, r)
	if err != nil {
		return
	}
	...
}

func editHandler(w http.ResponseWriter, r *http.Request) {
	title, err := getTitle(w, r)
	if err != nil {
		return
	}
	...
}

func saveHandler(w http.ResponseWriter, r *http.Request) {
	title, err := getTitle(w, r)
	if err != nil {
		return
	}
	...
}
8.12 函数字面值和闭包简介
在每个handler中处理错误又会引入大量重复代码。可以利用Go的函数字面值(function literal)将每个handler包装在一个函数中,由这个函数执行验证和错误检查。
首先,为每个handler函数增加一个title参数:
1
2
3
func viewHandler(w http.ResponseWriter, r *http.Request, title string)
func editHandler(w http.ResponseWriter, r *http.Request, title string)
func saveHandler(w http.ResponseWriter, r *http.Request, title string)
然后定义一个包装函数makeHandler(),接受以上类型的函数参数,返回一个http.HandlerFunc类型的函数(可以传递给http.HandleFunc()函数):
1
2
3
4
5
6
7
8
9
10
func makeHandler(fn func(http.ResponseWriter, *http.Request, string)) http.HandlerFunc {
	return func(w http.ResponseWriter, r *http.Request) {
		m := validPath.FindStringSubmatch(r.URL.Path)
		if m == nil {
			http.NotFound(w, r)
			return
		}
		fn(w, r, m[2])
	}
}
返回的函数称为闭包(closure),因为它引用(包围,enclose)了在其外部定义的值fn。参数fn将会是view、edit或save三个handler之一。
makeHandler()返回的闭包是一个接受http.ResponseWriter和*http.Request的函数(即http.HandlerFunc)。其功能与之前的getTitle()函数基本相同:从请求URL中提取标题并验证,如果不合法则返回404错误,否则调用handler函数fn。
接下来,在main()中使用makeHandler()包装handler函数:
1
2
3
4
5
6
7
func main() {
	http.HandleFunc("/view/", makeHandler(viewHandler))
	http.HandleFunc("/edit/", makeHandler(editHandler))
	http.HandleFunc("/save/", makeHandler(saveHandler))

	log.Fatal(http.ListenAndServe(":8080", nil))
}
最后从handler函数中删除getTitle()调用。
8.13 试试看
重新编译代码并运行程序:
1
2
$ go build wiki.go
$ ./wiki
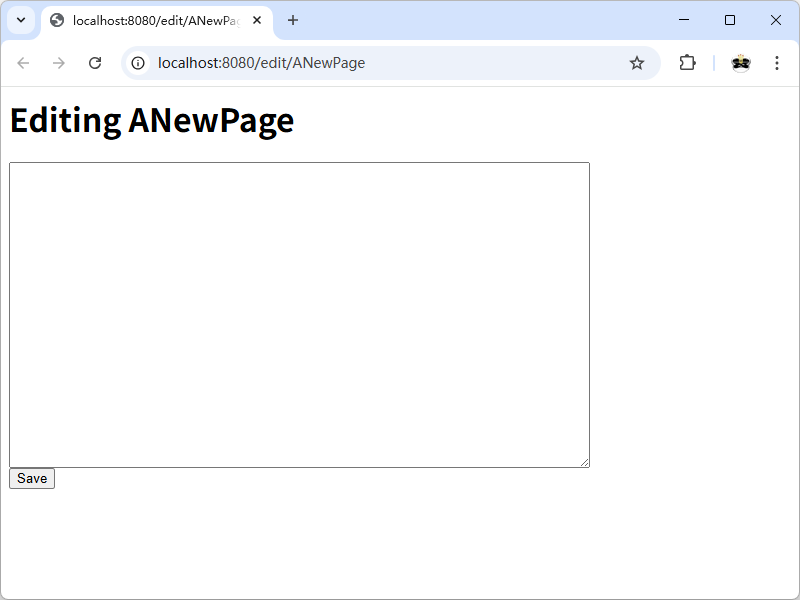
访问一个不存在的页面 http://localhost:8080/view/ANewPage ,将会显示页面编辑表单。
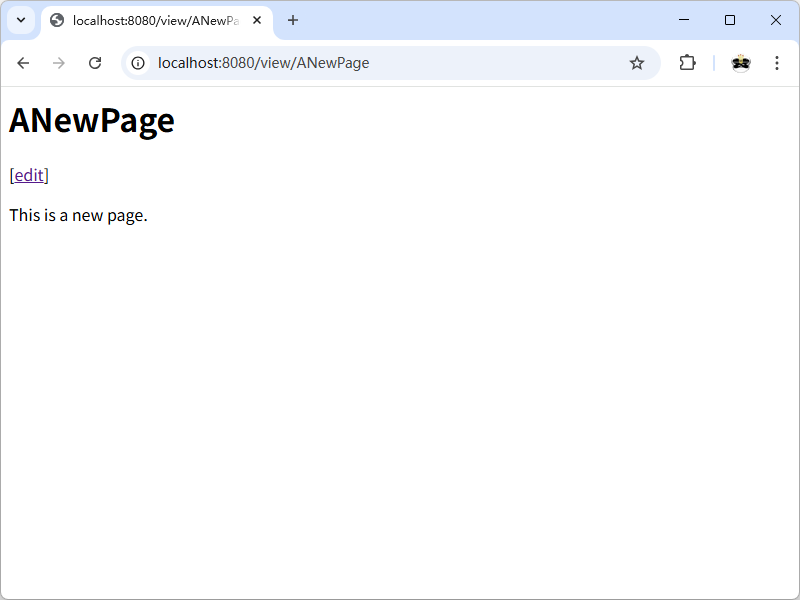
输入内容并点击Save按钮,将会重定向到新创建的页面。
进一步改进:
- 将模板存储在tmpl目录中,将页面数据存储在data目录中。
- 添加一个handler,将
/重定向到/view/FrontPage。 - 优化页面模板,使其成为完整有效的HTML并添加一些CSS规则。
- 实现页面间链接,将正文中的
[PageName]转换为<a href="/view/PageName">PageName</a>。(提示:可以使用regexp.ReplaceAllFunc()来实现)