【Scrapy】入门教程
Scrapy是一个快速的、高层次的网络爬虫框架,基于Python编写,用于爬取网页并提取结构化的数据
官方文档:https://docs.scrapy.org/en/latest/index.html
安装:pip install scrapy
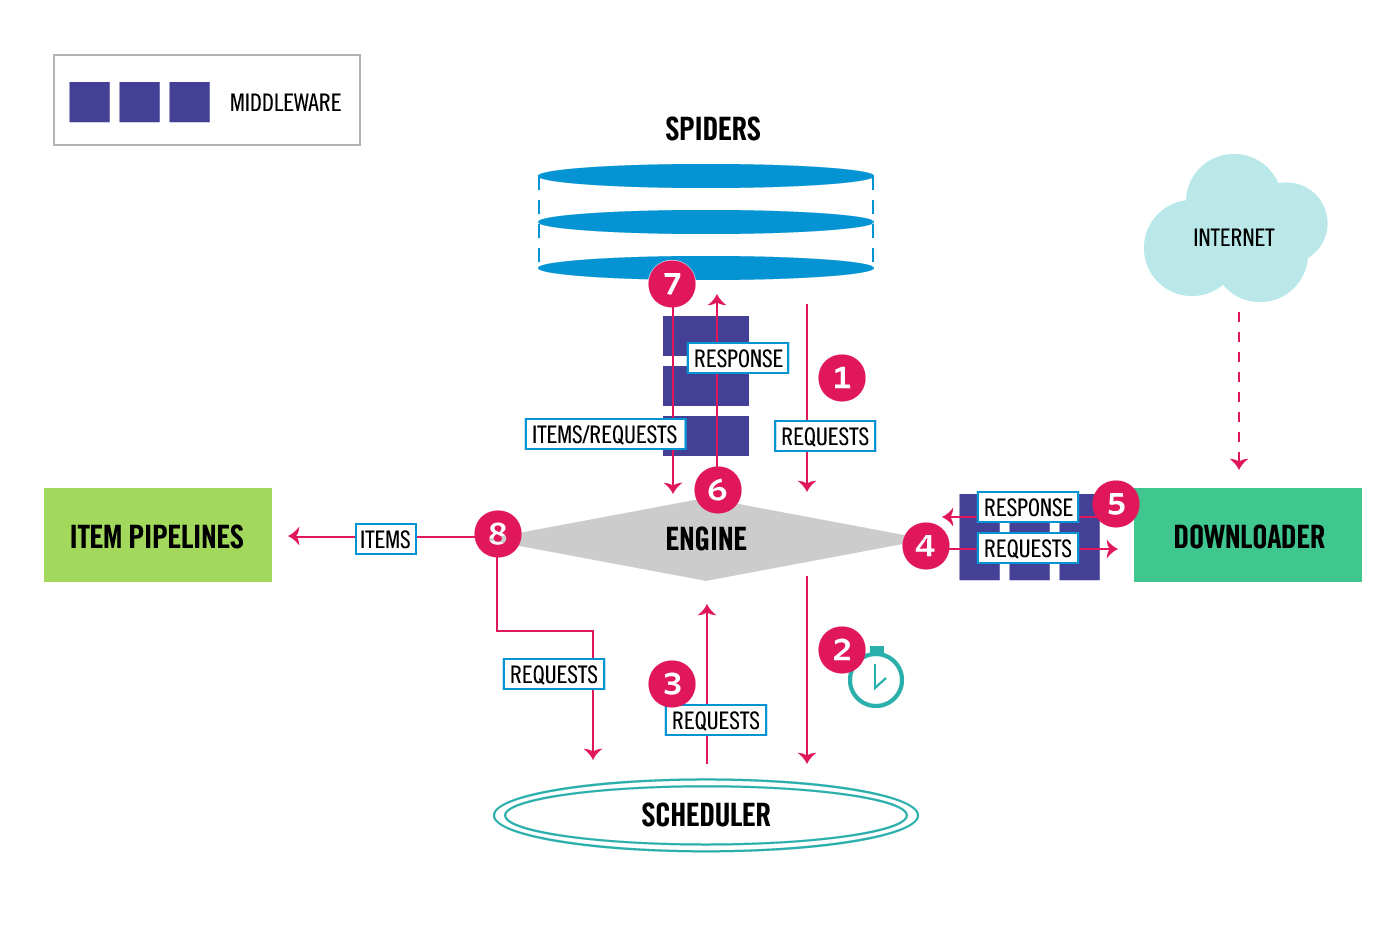
整体架构
https://docs.scrapy.org/en/latest/topics/architecture.html
核心组件
- 引擎(Scrapy Engine):负责Spider、Item Pipeline、Downloader、Scheduler中间的通讯,信号、数据传递等
- 调度器(Scheduler):负责接受引擎发送过来的Request请求,并按照一定的方式进行整理排列、入队
- 下载器(Downloader):负责下载引擎发送的所有请求,并将其获取到的Responses交还给引擎
- 爬虫(Spider):负责处理所有Responses,从中分析提取数据,并将需要跟进的URL提交给引擎,再次进入调度器
- 项目管道(Item Pipeline):负责处理Spider中获取到的Item,并进行进行后期处理(详细分析、过滤、存储等)
入门教程
官方文档:https://docs.scrapy.org/en/latest/intro/tutorial.html
源代码 https://github.com/ZZy979/scrapy_tutorial https://github.com/scrapy/quotesbot
1.创建项目
1
scrapy startproject scrapy_tutorial
其中scrapy是{Python安装目录}\Scripts\scrapy.exe
该命令创建了一个名为scrapy_tutorial的项目,目录结构如下:
1
2
3
4
5
6
7
8
9
10
scrapy_tutorial/
    scrapy.cfg            # 部署配置文件
    scrapy_tutorial/      # 项目的Python模块
        __init__.py
        items.py          # 定义Item
        middlewares.py    # 定义中间件
        pipelines.py      # 定义项目管道
        settings.py       # 设置文件
        spiders/          # 放置爬虫的目录
            __init__.py
2.编写爬虫(Spider)
爬虫是Scrapy用于从网站获取信息的类,所有爬虫必须继承scrapy.Spider类,爬虫类的功能包括定义初始请求、解析页面并提取数据以及跟踪后续链接
在tutorial/spiders目录下创建文件quotes_spider.py,第一个爬虫的代码如下:
1
2
3
4
5
6
7
8
9
10
11
12
13
14
15
16
import scrapy


class QuotesSpider(scrapy.Spider):
    name = 'quotes'
    start_urls = [
        'http://quotes.toscrape.com/page/1/',
        'http://quotes.toscrape.com/page/2/'
    ]

    def parse(self, response):
        page = response.url.split('/')[-2]
        filename = f'quotes-{page}.html'
        with open(filename, 'wb') as f:
            f.write(response.body)
        self.log(f'Saved file {filename}')
QuotesSpider类定义了以下属性和方法:
name:爬虫的名字,在一个项目中必须是唯一的start_urls:初始请求URLparse():用于处理响应的回调函数,参数response是一个scrapy.http.Response类型的对象,该方法解析响应包含的页面内容,从中提取数据和新的URL
该爬虫只是简单地将获取到的内容写入文件,尚未解析HTML和发现新的URL
3.运行爬虫
在项目根目录下运行
1
scrapy crawl quotes
该命令将运行刚才添加的名为quotes的爬虫,并将结果保存到quotes-1.html和quotes-2.html两个文件
通过PyCharm的Run configuration运行的方法见在PyCharm中调试Scrapy爬虫
4.提取数据
Scrapy使用CSS选择器和XPath两种方式从HTML中提取数据,并且提供了一个命令行工具用于学习和试验使用选择器提取数据
运行以下命令:
1
scrapy shell "http://quotes.toscrape.com/page/1/"
该命令将使用给定的URL发送一个请求,并进入交互式控制台,该命令还自动打印出了可使用的对象名称:
1
2
3
4
5
6
7
8
9
10
11
12
13
[s] Available Scrapy objects:
[s]   scrapy     scrapy module (contains scrapy.Request, scrapy.Selector, etc)
[s]   crawler    <scrapy.crawler.Crawler object at 0x00000187902603A0>
[s]   item       {}
[s]   request    <GET http://quotes.toscrape.com/page/1/>
[s]   response   <200 http://quotes.toscrape.com/page/1/>
[s]   settings   <scrapy.settings.Settings object at 0x000001879025DD00>
[s]   spider     <DefaultSpider 'default' at 0x187905a5eb0>
[s] Useful shortcuts:
[s]   fetch(url[, redirect=True]) Fetch URL and update local objects (by default, redirects are followed)
[s]   fetch(req)                  Fetch a scrapy.Request and update local objects
[s]   shelp()           Shell help (print this help)
[s]   view(response)    View response in a browser
其中最重要的是response和fetch(),response是请求返回的响应(即Spider.parse()方法的参数),提取数据的选择器均用于该对象;fetch()函数用于发送新的请求
选择器API及语法见选择器
5.跟踪链接
为quotes爬虫增加提取数据和跟踪链接的功能:对于提取到的数据,通过yield语句产生Item对象;对于新的URL,通过yield语句产生Request对象
1
2
3
4
5
6
7
8
9
10
11
12
def parse(self, response):
    for quote in response.css('div.quote'):
        yield {
            'text': quote.css('span.text::text').get(),
            'author': quote.css('small.author::text').get(),
            'tags': quote.css('div.tags a.tag::text').getall()
        }

    next_page = response.css('li.next a::attr(href)').get()
    if next_page is not None:
        # yield scrapy.Request(response.urljoin(next_page))
        yield response.follow(next_page, callback=self.parse)
其中,next_page是形如 “/page/2/” 的相对URL,需要使用response.urljoin()方法拼接为完整的URL,response.follow()方法可以自动完成这一过程
Request类构造函数的callback参数如果为None,则使用Spider的parse()方法,也可以指定其他的自定义回调函数,但参数列表要和parse()相同
注意:默认情况下,Scrapy会过滤已访问过的URL,可以通过DUPEFILTER_CLASS设置修改
6.Spider参数
可以通过scrapy crawl命令的-a选项向Spider传递参数:
1
scrapy crawl quotes -a tag=humor
该选项可重复多次,这些参数将被传递给Spider的构造函数并成为其属性
在上面的例子中,self.tag == 'humor'
官方文档:https://docs.scrapy.org/en/latest/topics/spiders.html#spider-arguments
参数传递过程研究:源码阅读——Spider参数传递
