Spark入门教程
1.简介
Apache Spark是一个开源的分布式计算框架,旨在提供快速、通用、易用的数据处理和分析技术。它可以在集群中处理大规模数据,支持多种数据处理模式,如批处理、交互式查询、流处理等。Spark还提供了丰富的API,包括Scala、Java、Python和R等语言的API,同时支持SQL查询和机器学习算法。Spark使用内存计算技术,在处理大规模数据时比Hadoop MapReduce更快,可以提高数据处理的效率。Spark还有一个名为Spark Streaming的库,可以用于实时数据处理和流处理。
2.下载
下载页面:https://spark.apache.org/downloads.html
Spark版本支持的Scala版本见页面上的说明,应该与使用的Scala版本保持一致。例如,Spark 3.4.0对应Scala 2.12。
示例代码:https://github.com/apache/spark/tree/master/examples
3.快速入门
https://spark.apache.org/docs/latest/quick-start.html
3.1 Spark Shell
本节使用交互式Spark Shell介绍基本API。
首先启动Shark Shell,在Spark解压目录下运行
1
2
3
4
5
6
7
8
9
10
11
12
13
14
15
16
$ ./bin/spark-shell
Spark context Web UI available at http://10.2.42.35:4040
Spark context available as 'sc' (master = local[*], app id = local-1686277810757).
Spark session available as 'spark'.
Welcome to
      ____              __
     / __/__  ___ _____/ /__
    _\ \/ _ \/ _ `/ __/  '_/
   /___/ .__/\_,_/_/ /_/\_\   version 3.4.0
      /_/

Using Scala version 2.12.17 (OpenJDK 64-Bit Server VM, Java 1.8.0_332_fiber)
Type in expressions to have them evaluated.
Type :help for more information.

scala>
实际上这是一个Scala Shell,并自动创建了一个SparkSession对象spark和一个SparkContext对象sc。
Spark的主要抽象是一个分布式集合,称为Dataset。可以使用spark.read.textFile()从本地或HDFS读取文本文件来创建一个Dataset[String],每行对应一个元素。
下面从Spark目录下的README文件创建一个Dataset:
1
2
scala> val textFile = spark.read.textFile("README.md")
textFile: org.apache.spark.sql.Dataset[String] = [value: string]
对于Dataset可以执行查询、过滤、转换、聚合等多种操作,详见Dataset API文档。例如:
1
2
3
4
5
6
7
8
9
10
11
12
13
14
15
16
17
18
19
20
21
22
23
24
25
// Number of items in this Dataset
scala> textFile.count()
res0: Long = 125

// First item in this Dataset
scala> textFile.first()
res1: String = # Apache Spark

scala> val linesWithSpark = textFile.filter(_.contains("Spark"))
linesWithSpark: org.apache.spark.sql.Dataset[String] = [value: string]

// How many lines contain "Spark"?
scala> textFile.filter(_.contains("Spark")).count()
res2: Long = 20

// find the line with the most words
scala> textFile.map(_.split(" ").size).reduce(Math.max(_, _))
res3: Int = 16

// implement MapReduce
scala> val wordCounts = textFile.flatMap(_.split(" ")).groupByKey(identity).count()
wordCounts: org.apache.spark.sql.Dataset[(String, Long)] = [key: string, count(1): bigint]

scala> wordCounts.collect()
res4: Array[(String, Long)] = Array(([![PySpark,1), (online,1), (graphs,1), (API,1), (["Building,1), (documentation,3), (command,,2), (abbreviated,1), ...)
Spark还支持将一个Dataset放在内存缓存中,这在数据被重复访问时是非常有用的。例如:
1
2
3
4
5
6
7
8
scala> linesWithSpark.cache()
res5: linesWithSpark.type = [value: string]

scala> linesWithSpark.count()
res6: Long = 20

scala> linesWithSpark.count()
res7: Long = 20
3.2 自包含应用
下面使用Spark API编写一个自包含的应用。
SimpleApp.scala
1
2
3
4
5
6
7
8
9
10
11
12
13
import org.apache.spark.sql.SparkSession

object SimpleApp {
  def main(args: Array[String]): Unit = {
    val logFile = "YOUR_SPARK_HOME/README.md" // Should be some file on your system
    val spark = SparkSession.builder.appName("Simple Application").getOrCreate()
    val logData = spark.read.textFile(logFile).cache()
    val numAs = logData.filter(line => line.contains("a")).count()
    val numBs = logData.filter(line => line.contains("b")).count()
    println(s"Lines with a: $numAs, Lines with b: $numBs")
    spark.stop()
  }
}
这个程序分别统计指定文件中包含 “a” 和 “b” 的行数,注意需要将YOUR_SPARK_HOME替换为Spark安装目录。和Spark Shell不同的是,在程序中需要使用SparkSession.builder初始化SparkSession。
可以使用sbt (Scala)、Maven (Java)或pip (Python)引入Spark依赖。以Maven为例:
1
2
3
4
5
6
<dependency>
    <groupId>org.apache.spark</groupId>
    <artifactId>spark-sql_2.12</artifactId>
    <version>3.4.0</version>
    <scope>provided</scope>
</dependency>
之后使用以下命令打包并执行:
1
2
3
4
5
6
7
$ mvn package
...
[INFO] Building jar: .../target/spark-demo-1.0.jar

$ YOUR_SPARK_HOME/bin/spark-submit --class SimpleApp --master "local[4]" target/spark-demo-1.0.jar
...
Lines with a: 72, Lines with b: 39
4.RDD
https://spark.apache.org/docs/latest/rdd-programming-guide.html
每个Spark程序都由一个驱动程序(driver program)组成。驱动程序运行用户的main方法,并在集群上执行不同的并行操作。
早期的Spark提供的主要抽象是弹性分布式数据集(resilient distributed dataset, RDD)。RDD是跨集群节点分区的元素集合,可以并行操作。
4.1 初始化Spark
Spark程序必须做的第一件事是创建一个SparkContext对象,用于告诉Spark如何访问集群:
1
2
val spark = SparkSession.builder.appName(name).master(master).getOrCreate()
val sc = spark.sparkContext
其中master是Spark集群的Master URL,如果运行在本地模式则为 “local” 。
4.1.1 使用Spark Shell
在Spark Shell中,已经自动创建了一个SparkContext,变量名为sc。可以使用--master选项指定Master URL,例如:
1
$ ./bin/spark-shell --master local[4]
完整选项列表见spark-shell --help。
4.2 弹性分布式数据集(RDD)
RDD是Spark的核心概念,是一个容错的、可以并行操作的元素集合。有两种方式创建RDD:并行化一个现有的集合,或者读取一个外部存储系统(例如HDFS)上的数据集。
4.2.1 并行化集合
可以使用sc.parallelize()将Scala的Seq[T]转换为RDD[T]。例如:
1
2
3
4
5
scala> val data = Array.range(1, 6)
data: Array[Int] = Array(1, 2, 3, 4, 5)

scala> val distData = sc.parallelize(data)
distData: org.apache.spark.rdd.RDD[Int] = ParallelCollectionRDD[0] at parallelize at <console>:24
RDD的一个重要参数是并行度(parallelism),即分区(partition)/分片(slice)个数。Spark会为集群的每个分区运行一个任务。通常Spark会根据集群自动设置分区数,也可以手动指定:
1
2
3
4
5
scala> val distData = sc.parallelize(data, 10)
distData: org.apache.spark.rdd.RDD[Int] = ParallelCollectionRDD[1] at parallelize at <console>:24

scala> distData.getNumPartitions
res0: Int = 10
4.2.2 外部数据集
Spark可以从任何Hadoop支持的存储源创建分布式数据集,包括本地文件系统、HDFS、Cassandra、HBase等,支持文本文件以及任何Hadoop InputFormat。
可以使用sc.textFile()读取文本文件创建RDD[String],每行对应一个元素。该方法的参数可以是本地路径或文件URI(例如hdfs://)。例如:
1
2
scala> val distFile = sc.textFile("data.txt")
distFile: org.apache.spark.rdd.RDD[String] = data.txt MapPartitionsRDD[3] at textFile at <console>:23
注:
- Spark所有基于文件的输入方法都支持单个文件、目录、压缩文件和通配符。
- 对于其他的Hadoop文件格式,可以使用
sc.newAPIHadoopFile()从HDFS读取一个文件并返回RDD[(K, V)],InputFormat指定读取文件时每个元素的key和value。例如,文本格式(TextInputFormat)的key是行号(LongWritable),value是一行(Text):
1
2
3
4
5
6
7
8
scala> import org.apache.hadoop.io.{LongWritable, Text}
import org.apache.hadoop.io.{LongWritable, Text}

scala> import org.apache.hadoop.mapreduce.lib.input.TextInputFormat
import org.apache.hadoop.mapreduce.lib.input.TextInputFormat

scala> val distFile = sc.newAPIHadoopFile[LongWritable, Text, TextInputFormat]("hdfs://...")
distFile: org.apache.spark.rdd.RDD[(org.apache.hadoop.io.LongWritable, org.apache.hadoop.io.Text)] = README.txt NewHadoopRDD[4] at newAPIHadoopFile at <console>:27
注意:新接口newAPIHadoopFile()使用的InputFormat是org.apache.hadoop.mapreduce.InputFormat,文本格式是org.apache.hadoop.mapreduce.lib.input.TextInputFormat;旧接口hadoopFile()使用的InputFormat是org.apache.hadoop.mapred.InputFormat,文本格式是org.apache.hadoop.mapred.TextInputFormat。
4.2.3 RDD操作
RDD支持两种类型的操作:
- 转换(transformation):从现有数据集创建新数据集。例如
map、filter、flatMap、mapPartitions、sample、union等。 - 动作(action):在对数据集进行计算后返回一个值。例如
reduce、collect、count、first、take、foreach、saveAsTextFile等。
在Spark中所有的transformation操作都是懒惰执行的,即不会立即计算结果,而是只记住转换操作,只有当action操作需要返回结果时才计算。
默认情况下,每次对RDD执行action操作都会重新计算。可以使用persist()或cache()方法将其放在内存中,从而加快查询。
4.2.3.1 基本操作
下面的代码展示了RDD的基本操作(文本文件来自To be, or not to be):
1
2
3
4
5
6
7
8
scala> val lines = sc.textFile("to-be-or-not-to-be.txt")
lines: org.apache.spark.rdd.RDD[String] = to-be-or-not-to-be.txt MapPartitionsRDD[1] at textFile at <console>:23

scala> val lineLengths = lines.map(_.length)
lineLengths: org.apache.spark.rdd.RDD[Int] = MapPartitionsRDD[2] at map at <console>:23

scala> val totalLength = lineLengths.reduce(_ + _)
totalLength: Int = 1453
第一行从外部文件创建了一个RDD lines,该数据集并没有立刻被加载到内存中,lines只是一个指向文件的指针。第二行定义了lineLengths作为map操作的结果。同样,lineLengths也不会被立即计算。最后,对lineLengths执行reduce操作,这是一个action。此时,Spark将会把计算分解成多个任务,运行在不同的机器上。每个机器执行自己部分的map和局部reduce,最后将结果返回driver程序。
常用操作:
完整列表参考RDD API文档。
4.2.3.2 将函数传递给Spark
Spark的API很大程度上依赖于在驱动程序中将函数传递到集群上运行。有两种推荐的方法:
- 匿名函数语法。例如
map(line => line.length())、reduce(_ + _)。 - 单例
object中的静态方法。例如:
1
2
3
4
5
object MyFunctions {
  def func1(s: String): String = { ... }
}

myRdd.map(MyFunctions.func1)
注意,虽然也可以传递实例方法的引用,但这需要包含该方法的对象一起发送到集群上。例如:
1
2
3
4
class MyClass {
  def func1(s: String): String = { ... }
  def doStuff(rdd: RDD[String]): RDD[String] = { rdd.map(func1) }
}
这等价于rdd.map(x => this.func1(x))。如果创建一个MyClass实例并对其调用doStuff(),其中的map()会引用该MyClass实例的func1()方法,因此需要将整个对象发送到集群。
注:这要求MyClass必须是可序列化的,否则将报错 “SparkException: Task not serializable” 。
类似地,访问外部对象的字段也会引用整个对象:
1
2
3
4
class MyClass {
  val field = "Hello"
  def doStuff(rdd: RDD[String]): RDD[String] = { rdd.map(x => field + x) }
}
这等价于rdd.map(x => this.field + x)。为了避免这一问题,最简单的方法是将field拷贝到局部变量中:
1
2
3
4
def doStuff(rdd: RDD[String]): RDD[String] = {
  val field_ = this.field
  rdd.map(x => field_ + x)
}
4.2.3.3 理解闭包
Spark的难点之一是在集群上执行代码时理解变量的作用域和生命周期。修改作用域之外的变量的RDD操作经常会造成混淆。
例如,考虑下面的RDD元素求和。在本地模式下(--master local[n])与部署到集群上(例如通过spark-submit提交到YARN)运行,其行为可能会有所不同。
1
2
3
4
5
6
7
var counter = 0
var rdd = sc.parallelize(data)

// Wrong: Don't do this!!
rdd.foreach(x => counter += x)

println("Counter value: " + counter)
上述代码的行为是未定义的,可能无法按预期工作。为了执行作业,Spark会将RDD操作分解为任务(task),每个任务由一个执行器(executor)执行。在执行之前,Spark会计算任务的闭包(closure)。闭包是执行器在RDD上执行计算(在本例中是foreach())时需要的变量和方法。这个闭包被序列化并发送给每个执行器。
发送给每个执行器的闭包内的变量是副本。因此,当counter在foreach()函数中被引用时,它不再是驱动节点内存中的counter!执行器只能看到闭包中的副本。因此,驱动节点上counter的最终值仍然为0。
而在本地模式下,foreach()函数可能会在与驱动相同的JVM中执行,因此会引用原始的counter并更新它。
为了确保在这些场景中有明确定义的行为,应该使用累加器(详见4.3.2节)。
另一个常见的习惯用法是尝试使用rdd.foreach(println)打印RDD的元素。在单台机器上,这将生成预期的输出。然而,在集群模式下,输出将被写入执行器的stdout,因此驱动节点的stdout不会显示输出!要在驱动节点上打印所有元素,可以使用collect()方法先将RDD元素传回驱动节点再打印:rdd.collect().foreach(println)。如果只需要打印几个元素,可以使用take():rdd.take(100).foreach(println)。
4.2.3.4 使用键值对
在Scala中,使用RDD[Tuple2]即可实现键值对操作。例如,下面的代码使用reduceByKey操作统计单词出现次数:
1
2
3
4
val lines = sc.textFile("to-be-or-not-to-be.txt")
val words = lines.flatMap(_.split(" "))
val wordCount = words.map(w => (w, 1)).reduceByKey(_ + _)
wordCount.sortBy(_._2, false).take(10)
键值对RDD独有的操作定义在PairRDDFunctions,例如groupByKey、reduceByKey、join、saveAsNewAPIHadoopFile等。
4.2.3.5 Shuffle操作
Shuffle是Spark在分布式计算过程中将数据重新分布的过程。可能导致shuffle的操作包括:
- 重新分区操作,如
repartition和coalesce - 分组操作,如
groupByKey和reduceByKey - join操作,如
join和cogroup
例如,在reduceByKey操作中,一个键的所有值可能位于不同分区、甚至不同机器上,必须使这些值位于同一个分区或节点上才能计算结果。Spark必须读取所有分区的数据,找到所有键对应的所有值,然后对于每个键将跨分区的值汇总起来以计算最终结果——这叫做shuffle。
Shuffle是一种非常昂贵的操作,因为它涉及磁盘I/O、数据序列化和网络I/O。为了组织shuffle所需的数据,Spark会生成一系列任务——map任务用于组织数据,reduce任务用于聚合数据。
可以通过调整配置参数来优化shuffle性能,参见Shuffle Behavior。
4.2.4 RDD持久化
RDD 持久化(或缓存)是一种将RDD存储到内存或磁盘中的机制。如果一个RDD被多个action操作使用,持久化可以避免重复计算,从而提升性能。
可以使用persist()或cache()方法将RDD标记为需要持久化。persist()方法允许指定存储级别(storage level),cache()方法是使用默认存储级别的简写形式。
例如:
1
2
3
val rdd = sc.parallelize(Seq.range(0, 1000000)).persist(StorageLevel.MEMORY_AND_DISK)
val sum = rdd.reduce(_ + _) // 触发计算并缓存
val count = rdd.count() // 直接使用缓存
常用的持久化级别如下:
MEMORY_ONLY(默认):将RDD存储到内存中,内存不足时部分分区不会被缓存MEMORY_AND_DISK:将RDD存储到内存,内存不足时将超出部分存储到磁盘MEMORY_ONLY_SER:将RDD序列化后存储到内存中,减少内存占用,但增加了序列化开销MEMORY_AND_DISK_SER:将RDD序列化后存储到内存中,内存不足时将超出部分存储到磁盘DISK_ONLY:将RDD存储到磁盘
Spark会监控缓存使用情况,并按照LRU原则删除旧的数据分区。如果想手动删除一个RDD,可以使用unpersist()方法。
4.3 共享变量
通常,当传递给Spark操作(例如map()或reduce())的函数在远程集群节点上执行时,函数中使用的变量会被拷贝到每台机器,并且远程机器对变量的更新不会传回驱动节点。Spark提供了两种类型的共享变量:广播变量和累加器。
4.3.1 广播变量
广播变量允许在每台机器上缓存一个只读变量,而不是随任务一起发送副本。例如,它们可以以高效的方式为每个节点提供一份大型输入数据集的副本。
广播变量通过调用SparkContext.broadcast(v)创建,它是v的包装器,可以通过调用value()方法访问其值。例如:
1
2
3
4
5
scala> val broadcastVar = sc.broadcast(Array(1, 2, 3))
broadcastVar: org.apache.spark.broadcast.Broadcast[Array[Int]] = Broadcast(0)

scala> broadcastVar.value
res0: Array[Int] = Array(1, 2, 3)
创建广播变量后,集群上运行的函数应该使用它而不是v。此外,v在广播后不应该被修改,以确保所有节点都获得相同的广播变量值。
4.3.2 累加器
累加器是只能(通过可结合、可交换运算)“加”的变量,可以高效地并行操作。可用于实现计数器或求和。Spark提供了数值类型的累加器,也可以添加对新类型的支持。
可以通过调用SparkContext.longAccumulator()或SparkContext.doubleAccumulator()来创建数值累加器。之后,集群上运行的任务可以使用add()方法添加值,但不能读取它的值。只有驱动程序可以使用value()方法读取累加器的值。
下面的代码使用累加器将数组元素相加:
1
2
3
4
5
6
7
scala> val accum = sc.longAccumulator("My Accumulator")
accum: org.apache.spark.util.LongAccumulator = LongAccumulator(id: 0, name: Some(My Accumulator), value: 0)

scala> sc.parallelize(Array(1, 2, 3, 4)).foreach(x => accum.add(x))

scala> accum.value
res1: Long = 10
可以通过继承AccumulatorV2支持自己的类型。
累加器不会改变Spark的惰性求值。如果在RDD操作中更新累加器,只有action操作才会更新,转换操作不会更新。例如:
1
2
3
val accum = sc.longAccumulator
data.map { x => accum.add(x); x }
// Here, accum is still 0 because no actions have caused the map operation to be computed.
5.Spark SQL
https://spark.apache.org/docs/latest/sql-programming-guide.html
Spark SQL是用于处理结构化数据的Spark模块。可以使用SQL或Dataset API(见3.1节)与Spark SQL交互。执行计算时,底层使用的执行引擎是相同的,与使用的API或语言无关。
Spark SQL的核心数据结构是DataFrame,即包含数据结构信息(列名、类型等)的Dataset(相当于关系型数据库表或pandas的DataFrame)。在Scala中,DataFrame是Dataset[Row]的别名。
RDD、Dataset和DataFrame的区别:
- RDD是分布式数据集合,是早期Spark使用的数据结构。
- Dataset也是分布式数据集合,是Spark 1.6新增的,在RDD的基础上增加了Spark SQL的优化。
- DataFrame是结构化数据集合,相当于
Dataset[Row]。
下面使用Spark Shell介绍DataFrame的基本操作。
完整示例代码:SparkSQLExample.scala
SQL参考:https://spark.apache.org/docs/latest/sql-ref.html
5.1 创建DataFrame
使用SparkSession,可以从RDD、Hive表或Spark数据源创建DataFrame。
5.1.1 JSON文件
可以使用spark.read.json(path)读取JSON数据集并转换为DataFrame,Spark SQL会自动推断schema。使用dataframe.write.json(path)写出JSON文件。
注意,这里的JSON文件格式实际上叫做JSON Lines,每行都是一个单独的JSON对象。
例如,文件people.json包含一些人员信息:
1
2
3
{"name":"Michael"}
{"name":"Andy", "age":30}
{"name":"Justin", "age":19}
下面的代码基于以上JSON文件的内容创建了一个DataFrame:
1
2
3
4
5
6
7
8
9
10
11
12
scala> val df = spark.read.json("people.json")
df: org.apache.spark.sql.DataFrame = [age: bigint, name: string]

// Displays the content of the DataFrame to stdout
scala> df.show
+----+-------+
| age|   name|
+----+-------+
|null|Michael|
|  30|   Andy|
|  19| Justin|
+----+-------+
5.1.2 CSV文件
Spark SQL提供了spark.read.csv(path)读取CSV格式的文件或目录并转换为DataFrame,dataframe.write.csv(path)写出CSV文件。可以使用option()指定读写选项,例如列名、分隔符等。
例如,文件people.csv的内容如下:
1
2
3
name,age,job
Jorge,30,Developer
Bob,32,Developer
下面的代码将这个CSV文件读取为DataFrame,使用第一行作为列名,并自动推断schema:
1
2
3
4
5
6
7
8
9
10
scala> val df = spark.read.option("header", "true").option("inferSchema", "true").csv(path)
df: org.apache.spark.sql.DataFrame = [name: string, age: int ... 1 more field]

scala> df.show
+-----+---+---------+
| name|age|      job|
+-----+---+---------+
|Jorge| 30|Developer|
|  Bob| 32|Developer|
+-----+---+---------+
如果不指定header选项,则将第一行视为数据内容,列名为_c0, _c1…;如果不指定inferSchema选项,则所有列的类型均为字符串。
完整选项列表参见CSV Files - Data Source Option。
5.1.3 Scala集合
可以使用toDF()方法从Scala集合创建DataFrame,必须先导入spark.implicits._。可以通过toDF()的参数指定列名,Spark将自动推断类型。例如:
1
2
3
4
5
6
7
8
9
10
11
12
13
// for toDF()
scala> import spark.implicits._

scala> val df = Seq((30, "Andy"), (19, "Justin")).toDF("age", "name")
df: org.apache.spark.sql.DataFrame = [age: int, name: string]

scala> df.show
+---+------+
|age|  name|
+---+------+
| 30|  Andy|
| 19|Justin|
+---+------+
如果要包含null,则必须使用None和Some:
1
2
3
4
5
6
7
8
9
10
11
scala> val df = Seq((None, "Michael"), (Some(30), "Andy"), (Some(19), "Justin")).toDF("age", "name")
df: org.apache.spark.sql.DataFrame = [age: int, name: string]

scala> df.show
+----+-------+
| age|   name|
+----+-------+
|null|Michael|
|  30|   Andy|
|  19| Justin|
+----+-------+
如果集合元素类型是case类,则无需指定列名:
1
2
3
4
5
6
7
8
9
10
11
12
13
14
scala> case class Person(name: String, age: Int, job: String)

scala> val data = Seq(Person("Jorge", 30, "Developer"), Person("Bob", 32, "Developer"))

scala> val df = data.toDF()
df: org.apache.spark.sql.DataFrame = [name: string, age: int ... 1 more field]

scala> df.show
+-----+---+---------+
| name|age|      job|
+-----+---+---------+
|Jorge| 30|Developer|
|  Bob| 32|Developer|
+-----+---+---------+
5.2 DataFrame操作
DataFrame提供了结构化数据操作。
下面是一些基本示例:
1
2
3
4
5
6
7
8
9
10
11
12
13
14
15
16
17
18
19
20
21
22
23
24
25
26
27
28
29
30
31
32
33
34
35
36
37
38
39
40
41
42
43
44
45
46
// Print the schema in a tree format
scala> df.printSchema
root
 |-- age: long (nullable = true)
 |-- name: string (nullable = true)

// Select only the "name" column
scala> df.select("name").show
+-------+
|   name|
+-------+
|Michael|
|   Andy|
| Justin|
+-------+

// This import is needed to use the $-notation
scala> import spark.implicits._

// Select everybody, but increment the age by 1
scala> df.select($"name", $"age" + 1).show()
+-------+---------+
|   name|(age + 1)|
+-------+---------+
|Michael|     null|
|   Andy|       31|
| Justin|       20|
+-------+---------+

// Select people older than 21
scala> df.filter($"age" > 21).show
+---+----+
|age|name|
+---+----+
| 30|Andy|
+---+----+

// Count people by age
scala> df.groupBy("age").count.show
+----+-----+
| age|count|
+----+-----+
|  19|    1|
|null|    1|
|  30|    1|
+----+-----+
注:
$"name"等价于col("name")df.select($"name", $"age" + 1)等价于df.select(col("name"), expr("age + 1"))和df.selectExpr("name", "age + 1")df.filter($"age" > 21)等价于df.filter("age > 21")
其中col()、expr()等函数定义在 org.apache.spark.sql.functions。
下面是一些常用的DataFrame操作:
| SQL子句 | DataFrame操作 |
|---|---|
| SELECT | select()或selectExpr() |
| 增加列 | withColumn() |
| AS | withColumnRenamed() |
| JOIN | join() |
| WHERE | filter()或where() |
| GROUP BY | groupBy().agg() |
| ORDER BY | sort()或orderBy() |
完整列表见Dataset API文档。
除了引用列和表达式外,Spark SQL还提供了丰富的函数库,包括字符串操作、日期运算、常见数学函数等,另外还支持用户自定义函数(UDF)。详见DataFrame Function Reference。
5.3 SQL查询
SparkSession的sql()方法可以运行SQL查询,并将结果作为DataFrame返回。例如:
1
2
3
4
5
6
7
8
9
10
11
12
13
14
15
16
17
18
// Register the DataFrame as a SQL temporary view
scala> df.createOrReplaceTempView("people")

scala> spark.sql("SELECT * FROM people").show
+----+-------+
| age|   name|
+----+-------+
|null|Michael|
|  30|   Andy|
|  19| Justin|
+----+-------+

scala> spark.sql("SELECT name FROM people WHERE age > 21").show
+----+
|name|
+----+
|Andy|
+----+
SQL语法参考:SQL Reference
5.3.1 窗口函数
https://spark.apache.org/docs/latest/sql-ref-syntax-qry-select-window.html
窗口函数对一组行(称为窗口)进行操作,并为每行计算一个返回值。窗口函数可用于处理排名、前缀和、移动平均值等任务。
例如,有如下的员工数据:
1
2
3
4
5
6
7
8
9
10
11
12
CREATE TABLE employees (name STRING, dept STRING, salary INT, age INT);

INSERT INTO employees VALUES
    ("Lisa", "Sales", 10000, 35),
    ("Evan", "Sales", 32000, 38),
    ("Fred", "Engineering", 21000, 28),
    ("Alex", "Sales", 30000, 33),
    ("Tom", "Engineering", 23000, 33),
    ("Jane", "Marketing", 29000, 28),
    ("Jeff", "Marketing", 35000, 38),
    ("Paul", "Engineering", 29000, 23),
    ("Chloe", "Engineering", 23000, 25);
计算每个部门内员工的年龄排名:
1
2
3
4
5
6
7
8
9
10
11
12
13
14
SELECT name, dept, age, RANK() OVER (PARTITION BY dept ORDER BY age) AS rank FROM employees;
+-----+-----------+---+----+
| name|       dept|age|rank|
+-----+-----------+---+----+
| Alex|      Sales| 33|   1|
| Lisa|      Sales| 35|   2|
| Evan|      Sales| 38|   3|
| Paul|Engineering| 23|   1|
|Chloe|Engineering| 25|   2|
| Fred|Engineering| 28|   3|
|  Tom|Engineering| 33|   4|
| Jane|  Marketing| 28|   1|
| Jeff|  Marketing| 38|   2|
+-----+-----------+---+----+
计算每个部门内员工薪水的前缀和:
1
2
3
4
5
6
7
8
9
10
11
12
13
14
SELECT name, dept, salary, SUM(salary) OVER (PARTITION BY dept ORDER BY salary) AS prefix_salary FROM employees;
+-----+-----------+------+-------------+
| name|       dept|salary|prefix_salary|
+-----+-----------+------+-------------+
| Lisa|      Sales| 10000|        10000|
| Alex|      Sales| 30000|        40000|
| Evan|      Sales| 32000|        72000|
| Fred|Engineering| 21000|        21000|
|Chloe|Engineering| 23000|        67000|
|  Tom|Engineering| 23000|        67000|
| Paul|Engineering| 29000|        96000|
| Jane|  Marketing| 29000|        29000|
| Jeff|  Marketing| 35000|        64000|
+-----+-----------+------+-------------+
使用代码实现:
1
2
3
4
5
import org.apache.spark.sql.expressions.Window

val window = Window.partitionBy("dept").orderBy("salary")
val result = df.withColumn("prefix_salary", sum("salary").over(window))
  .select("name", "dept", "salary", "prefix_salary")
5.4 创建Dataset
可以使用toDS()方法从Scala集合创建Dataset,必须先导入spark.implicits._。例如:
1
2
3
4
5
6
7
8
9
10
11
12
13
14
15
16
17
18
19
20
21
22
23
24
25
26
27
28
29
30
31
32
33
34
35
36
scala> case class Person(name: String, age: Long)
defined class Person

// for toDS()
scala> import spark.implicits._

// Encoders are created for case classes
scala> val caseClassDS = Seq(Person("Andy", 32)).toDS
caseClassDS: org.apache.spark.sql.Dataset[Person] = [name: string, age: bigint]

scala> caseClassDS.show
+----+---+
|name|age|
+----+---+
|Andy| 32|
+----+---+

// Encoders for most common types are automatically provided by importing spark.implicits._
scala> val primitiveDS = Seq(1, 2, 3).toDS
primitiveDS: org.apache.spark.sql.Dataset[Int] = [value: int]

scala> primitiveDS.map(_ + 1).collect
res21: Array[Int] = Array(2, 3, 4)

// DataFrames can be converted to a Dataset by providing a class. Mapping will be done by name
scala> val peopleDS = spark.read.json("examples/src/main/resources/people.json").as[Person]
peopleDS: org.apache.spark.sql.Dataset[Person] = [age: bigint, name: string]

scala> peopleDS.show
+----+-------+
| age|   name|
+----+-------+
|null|Michael|
|  30|   Andy|
|  19| Justin|
+----+-------+
注:如果元素类型不是case类,则默认只有一个名为 “value” 的列。例如:
1
2
3
4
5
6
7
8
9
10
11
scala> val ds = Seq(1, 2, 3).toDS
ds: org.apache.spark.sql.Dataset[Int] = [value: int]

scala> ds.show
+-----+
|value|
+-----+
|    1|
|    2|
|    3|
+-----+
5.5 与RDD互操作
RDD与Dataset/DataFrame可以相互转换:
- RDD转Dataset:
rdd.toDS()或spark.createDataset() - RDD转DataFrame:
rdd.toDF()或spark.createDataFrame() - Dataset/DataFrame转RDD:
df.rdd
其中,使用toDS()和toDF()之前需要import spark.implicits._
Spark SQL支持两种不同的方式将RDD转换为DataFrame。第一种方法是使用反射自动推断数据模式(schema)(即列名和类型),第二种方法是手动构造数据模式。
5.5.1 使用反射推断schema
Spark SQL的Scala接口支持将包含case类的RDD自动转换为DataFrame,case类定义了DataFrame的schema。
例如,下面的代码将文本文件people.txt读取为一个RDD[Person],并转换为DataFrame:
1
2
3
4
5
6
7
8
9
10
11
12
13
14
15
16
17
18
19
20
21
22
23
24
25
26
// For implicit conversions from RDDs to DataFrames
scala> import spark.implicits._
import spark.implicits._

// Create an RDD of Person objects from a text file, convert it to a Dataframe
scala> val peopleRDD = sc.textFile("examples/src/main/resources/people.txt").map(_.split(",")).map(a => Person(a(0), a(1).trim.toInt))
peopleRDD: org.apache.spark.rdd.RDD[Person] = MapPartitionsRDD[3] at map at <console>:28

scala> val peopleDF = peopleRDD.toDF
peopleDF: org.apache.spark.sql.DataFrame = [name: string, age: bigint]

scala> peopleDF.show
+-------+---+
|   name|age|
+-------+---+
|Michael| 29|
|   Andy| 30|
| Justin| 19|
+-------+---+

scala> peopleDF.filter("age BETWEEN 13 AND 19").show
+------+---+
|  name|age|
+------+---+
|Justin| 19|
+------+---+
5.5.2 手动指定schema
当无法提前定义case类时,可以通过以下三步手动指定schema:
- 从原始RDD创建一个
RDD[Row] - 根据schema创建一个
StructType - 通过
SparkSession.createDataFrame()方法将schema应用到RDD
例如:
1
2
3
4
5
6
7
8
9
10
11
12
13
14
15
16
17
18
19
20
21
22
23
24
25
26
27
28
29
30
31
32
33
scala> import org.apache.spark.sql.Row
import org.apache.spark.sql.Row

scala> import org.apache.spark.sql.types._
import org.apache.spark.sql.types._

// Create an RDD
scala> val peopleRDD = sc.textFile("examples/src/main/resources/people.txt")
peopleRDD: org.apache.spark.rdd.RDD[String] = examples/src/main/resources/people.txt MapPartitionsRDD[11] at textFile at <console>:30

// Generate the schema
scala> val schema = StructType(Array(
     |   StructField("name", StringType, nullable = true),
     |   StructField("age", IntegerType, nullable = true)
     | ))
schema: org.apache.spark.sql.types.StructType = StructType(StructField(name,StringType,true),StructField(age,IntegerType,true))

// Convert records of the RDD (people) to Rows
scala> val rowRDD = peopleRDD.map(_.split(",")).map(a => Row(a(0), a(1).trim.toInt))
rowRDD: org.apache.spark.rdd.RDD[org.apache.spark.sql.Row] = MapPartitionsRDD[17] at map at <console>:30

// Apply the schema to the RDD
val peopleDF = spark.createDataFrame(rowRDD, schema)
peopleDF: org.apache.spark.sql.DataFrame = [name: string, age: int]

scala> peopleDF.show()
+-------+---+
|   name|age|
+-------+---+
|Michael| 29|
|   Andy| 30|
| Justin| 19|
+-------+---+
5.6 标量函数
标量函数是对于每行返回单个值的函数,包括数学函数、字符串函数、日期时间函数等。完整列表见Built-in Scalar Functions。
5.7 聚合函数
聚合函数是对于每个分组返回一个值的函数,例如count(), count_distinct(), avg(), max(), min()等。完整列表见Built-in Aggregation Functions。
5.8 数据源
Spark SQL支持从多种不同的数据源加载数据,包括文本文件、CSV、JSON、Hive表等等。详见Data Sources。
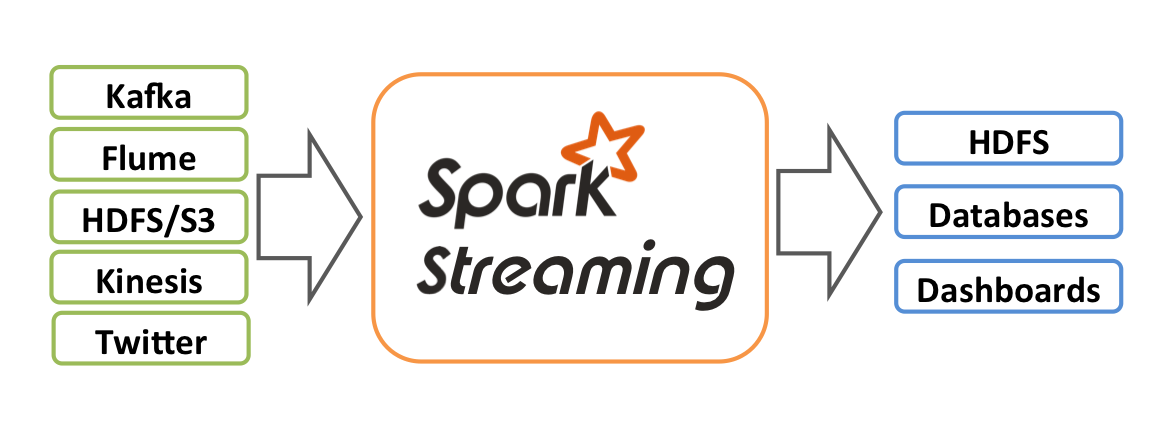
6.Spark Streaming
https://spark.apache.org/docs/latest/streaming-programming-guide.html
注:Spark Streaming是上一代的Spark流引擎,已经不再更新。流式引用应该使用新的流引擎Structured Streaming。
Spark Streaming用于处理流式数据,可以从多种数据源(例如Kafka、TCP套接字)消费数据,使用高层次函数(例如map、reduce、join和window)处理数据,并将处理后的数据输出到文件系统、数据库等。
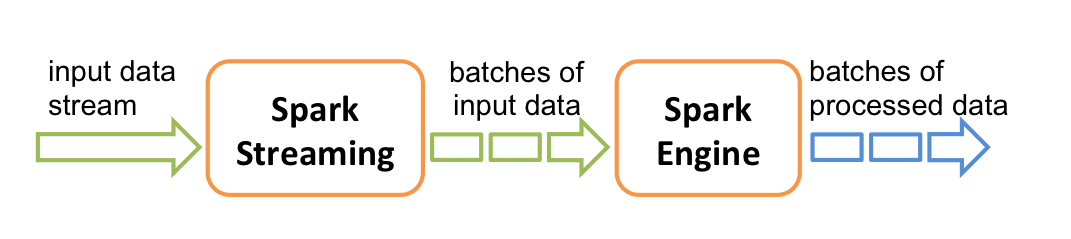
Spark Streaming内部将输入数据流划分成批次(batch),之后使用Spark引擎处理。
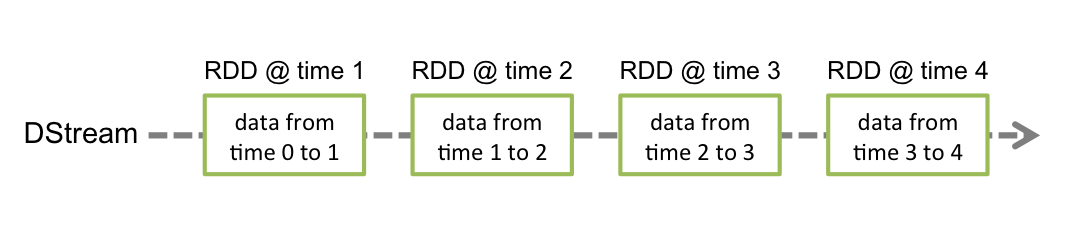
Spark Streaming提供的高层次抽象称为离散流(discretized stream, DStream),内部表示为RDD序列。
下面介绍如何编写Spark Streaming程序。
6.1 简单示例
假设我们希望统计从TCP套接字接收到的文本数据中的单词数,步骤如下。
首先,创建流式应用的主入口StreamingContext,具有2个执行线程、分批间隔为1秒:
1
2
3
4
5
6
7
import org.apache.spark.SparkConf
import org.apache.spark.streaming.{Seconds, StreamingContext}

// Create a local StreamingContext with two working threads and batch interval of 1 second.
// The master requires 2 cores to prevent a starvation scenario.
val conf = new SparkConf().setMaster("local[2]").setAppName("NetworkWordCount")
val ssc = new StreamingContext(conf, Seconds(1))
之后创建一个DStream,表示来自TCP套接字的流式数据,指定主机名和端口号:
1
2
// Create a DStream that will connect to hostname:port, like localhost:9999
val lines = ssc.socketTextStream("localhost", 9999)
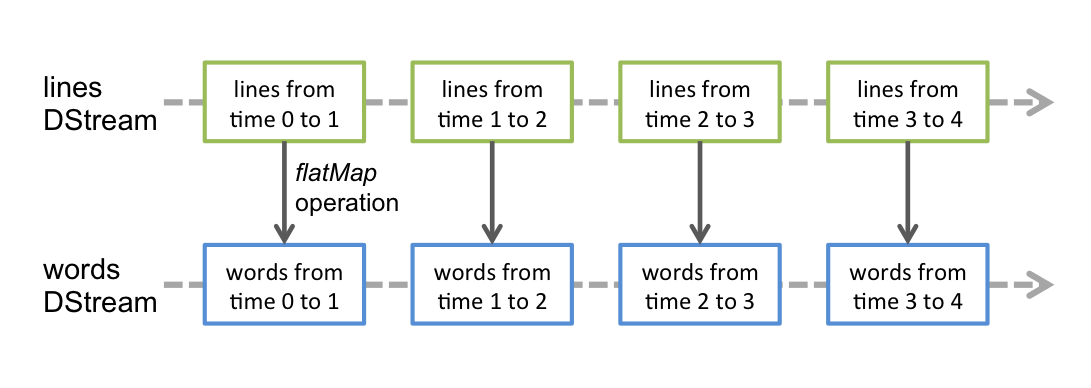
DStream中的每条记录是一行文本。接下来,使用空格将文本行分割为单词:
1
2
// Split each line into words
val words = lines.flatMap(_.split(" "))
flatMap是一个一对多操作,创建了一个新的DStream。下面统计单词数:
1
2
3
4
5
6
// Count each word in each batch
val pairs = words.map(word => (word, 1))
val wordCounts = pairs.reduceByKey(_ + _)

// Print the first ten elements of each RDD generated in this DStream to the console
wordCounts.print()
注:在流式应用中,数据是源源不断到达的,通常是无尽的,因此需要对数据流分批处理。该示例是将每秒内到达的数据作为一个批次,对每个批次分别统计单词数。
注意,(类似于RDD操作)Spark Streaming操作也是懒惰执行的,上面几行代码只记录了要执行的计算,而不会立即执行。要开始处理,需要调用
1
2
ssc.start()             // Start the computation
ssc.awaitTermination()  // Wait for the computation to terminate
完整示例代码:NetworkWordCount
要运行该示例,首先运行Netcat:
1
$ nc -lk 9999
在另一个终端运行:
1
$ ./bin/run-example streaming.NetworkWordCount localhost 9999
之后在Netcat终端输入任意文本,Spark终端将会每秒统计并打印单词数:
1
2
3
4
$ nc -lk 9999
hello world
hello world hello world
^C
1
2
3
4
5
6
7
8
9
10
11
12
13
14
15
16
17
18
$ ./bin/run-example streaming.NetworkWordCount localhost 9999
...
-------------------------------------------
Time: 1697455022000 ms
-------------------------------------------
(world,1)
(hello,1)

-------------------------------------------
Time: 1697455023000 ms
-------------------------------------------

-------------------------------------------
Time: 1697455024000 ms
-------------------------------------------
(world,2)
(hello,2)
...
注:为了便于观察输出,可以将日志级别改为warn。将conf目录下的log4j2.properties.template拷贝到log4j2.properties,并将其中的rootLogger.level = info改为rootLogger.level = warn。详见Configuring Logging。
6.2 依赖
Spark Streaming应用需要添加以下依赖:
1
2
3
4
5
6
<dependency>
    <groupId>org.apache.spark</groupId>
    <artifactId>spark-streaming_2.12</artifactId>
    <version>3.4.0</version>
    <scope>provided</scope>
</dependency>
如果要从Kafka等数据源消费数据,还需要添加对应的依赖,例如spark-streaming-kafka-0-10_2.12。
6.3 初始化StreamingContext
Spark Streaming程序的主入口是StreamingContext,可以从SparkConf对象创建,并指定分批间隔:
1
2
val conf = new SparkConf().setMaster(master).setAppName(appName)
val ssc = new StreamingContext(conf, Seconds(1))
其中master是集群的Master URL,如果运行在本地模式则为 “local[*]” 。通过spark-submit启动应用时,可以使用--master选项指定Master URL。分批间隔应当根据应用的延迟要求和可用集群资源来设置。
StreamingContext将会自动创建SparkContext,可以通过ssc.sparkContext访问。
初始化StreamingContext之后:
- 通过输入DStream定义输入源。
- 通过DStream转换和输出操作定义流式计算。
- 使用
ssc.start()开始接收和处理数据。 - 使用
ssc.awaitTermination()等待处理结束(手动停止或遇到错误)。 - 或者使用
ssc.stop()手动停止处理。
6.4 离散流(DStream)
离散流(discretized stream, DStream)是Spark Streaming提供的基本抽象,表示连续的数据流。DStream在内部表示为RDD序列,每个RDD包含来自一定时间间隔的数据,如下图所示。
作用于DStream上的任何操作都会转换为底层RDD上的操作。例如,在6.1节的例子中,lines.flatMap()生成words,如下图所示。
6.5 输入DStream和接收器
输入DStream (InputDStream)表示输入数据流。在6.1节的例子中,lines是表示从netcat接收到的数据流的输入DStream。每个输入DStream(除文件流外)都关联了一个接收器(Receiver)对象。
Spark Streaming提供了一些内置数据源:
(1)基本数据源:StreamingContext API直接提供的数据源,例如:
socketStream()或socketTextStream():来自TCP套接字的数据。fileStream()或textFileStream():读取HDFS等文件系统上的文件(监测目录中的新文件)。queueStream():基于RDD队列创建输入DStream,通常用于测试Spark Streaming应用。
(2)高级数据源:需要添加依赖的数据源,例如Kafka、Kinesis等。
(3)自定义数据源
- 自定义接收器:继承
Receiver类,在onStart()方法中启动新线程,在线程中调用store()方法存储接收到的数据,最后使用ssc.receiverStream()从接收器创建输入DStream。详见Custom Receiver Guide。 - 自定义输入DStream:继承
InputDStream类,实现compute()、start()和stop()方法。compute(time)方法生成给定时间的RDD,time是按分批间隔对齐的时间戳。例如,假设分批间隔是5分钟,应用在10:03开始运行,则compute()方法会依次在10:05、10:10、10:15等时刻被调用,参数是对应的时间戳。
6.6 DStream操作
完整列表见API文档DStream和PairDStreamFunctions。
6.6.1 转换操作
与RDD类似,DStream允许通过转换(transformation)操作修改其中的数据。常用的转换操作:map、flatMap、filter、repartition、union、count、reduce、countByValue等。
键值对DStream独有的操作包括groupByKey、reduceByKey、join、cogroup等。
6.6.2 窗口操作
Spark Streaming还提供了窗口操作,可以在数据的滑动窗口上执行转换操作,如下图所示。
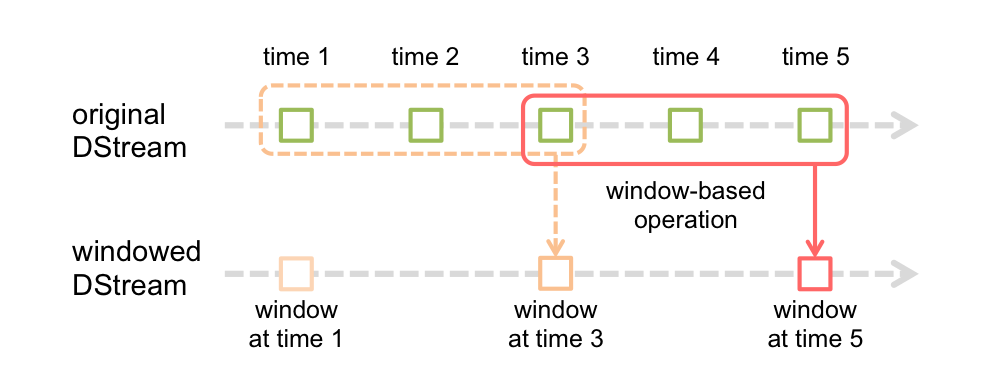
落在窗口中的RDD将被组合并执行转换操作,以生成输出DStream中的RDD。
窗口操作需要指定两个参数:窗口长度和滑动距离。在这个例子中,窗口长度为3个时间单位,滑动距离为2个时间单位。这两个参数必须是输入DStream分批间隔的整数倍。
例如,在6.1节的例子中,如果希望每10秒钟计算过去30秒的单词数,可以对pairs执行reduceByKeyAndWindow()操作:
1
2
// Reduce last 30 seconds of data, every 10 seconds
val windowedWordCounts = pairs.reduceByKeyAndWindow((a: Int, b: Int) => (a + b), Seconds(30), Seconds(10))
常用的窗口操作:window、countByWindow、reduceByWindow、reduceByKeyAndWindow、reduceByKeyAndWindow、countByValueAndWindow等。
6.6.3 join操作
在Spark Streaming中可以很容易地执行join操作。
(1) DStream-DStream join
1
2
3
val stream1: DStream[String, String] = ...
val stream2: DStream[String, String] = ...
val joinedStream = stream1.join(stream2)
在每个批次中,stream1的RDD与stream2的RDD进行join。另外,也可以执行outer join:leftOuterJoin、rightOuterJoin、fullOuterJoin。
(2) DStream-DataSet join
1
2
3
val dataset: RDD[String, String] = ...
val windowedStream = stream.window(Seconds(20))...
val joinedStream = windowedStream.transform { rdd => rdd.join(dataset) }
6.6.4 输出操作
DStream的输出操作将数据输出到外部系统,例如数据库或文件系统。输出操作会触发DStream转换操作的执行(类似于RDD的action)。目前支持的输出操作:print、saveAsTextFiles、saveAsObjectFiles、saveAsHadoopFiles、foreachRDD。
6.7 DataFrame和SQL操作
在foreachRDD中,可以对RDD使用DataFrame和SQL操作。
6.8 缓存/持久化
与RDD类似,DStream可以通过persist()方法将数据保存在内存中,这将自动保存DStream中的每个RDD。如果DStream中的数据将被多次计算(例如窗口操作),这会非常有用。窗口操作生成的DStream会自动保存在内存中,不需要手动调用persist()。
6.9 检查点
https://spark.apache.org/docs/latest/streaming-programming-guide.html#checkpointing
7.Structured Streaming
https://spark.apache.org/docs/latest/structured-streaming-programming-guide.html